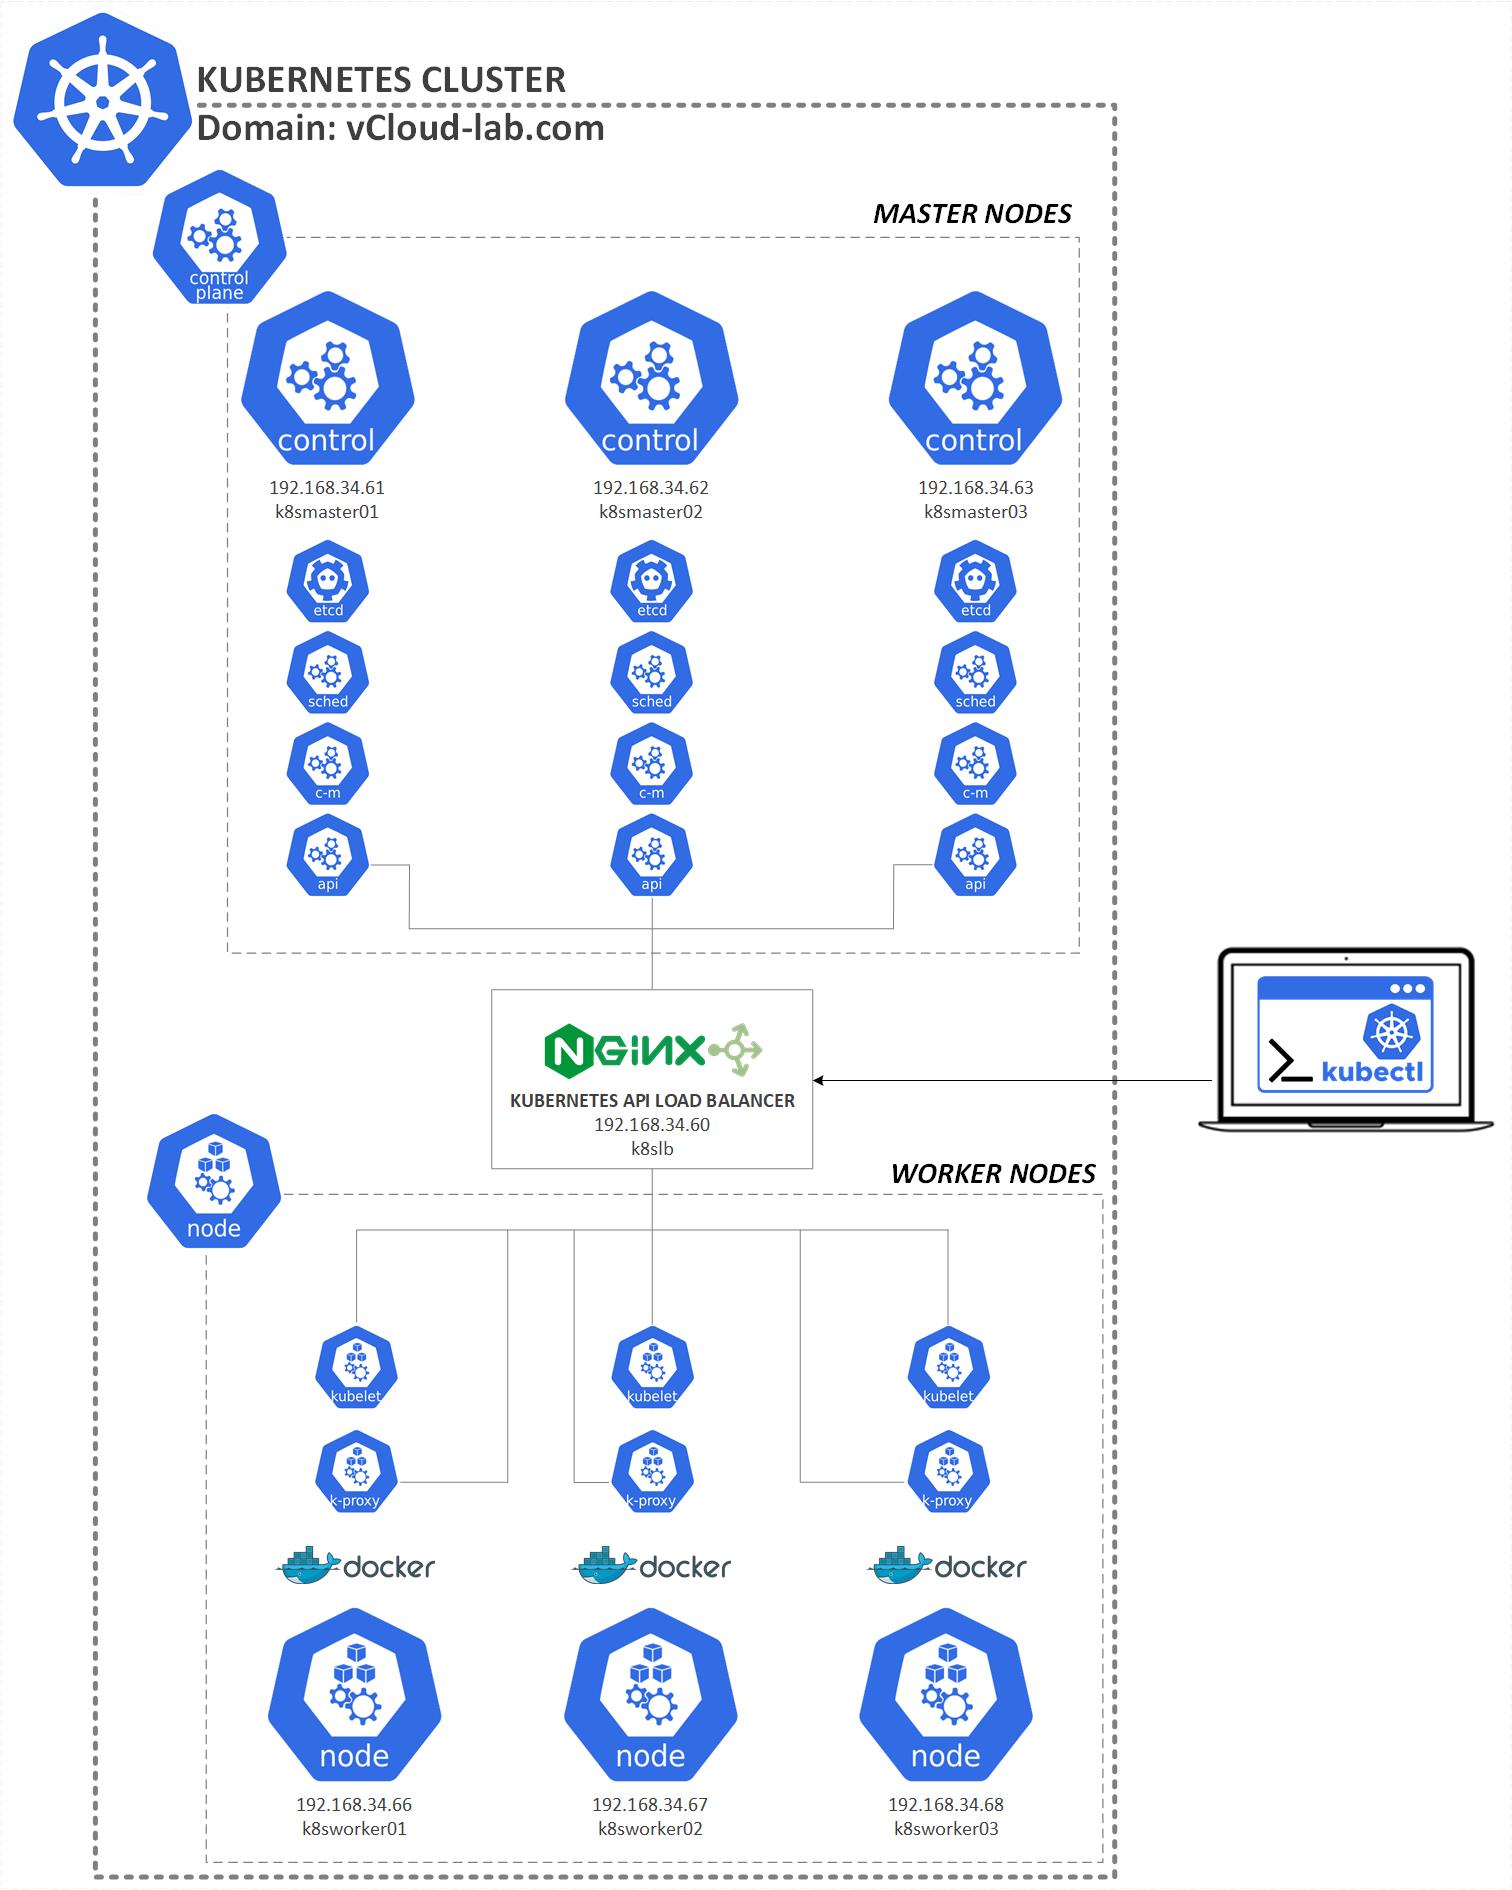
In this third part of configuration of Kubernetes cluster I have completed earlier part of a blog Install and configure Kubernetes cluster master nodes using kubeadm - Part 2. I have three Ubuntu server nodes installed in my lab for Worker nodes to add in Kubernetes cluster using kubeadm tool. Below is the diagram of my home lab Kubernetes cluster. Here Load balancer and control plane Master nodes are in place and setup.
Check out: Configure Nginx Load Balancer for the Kubernetes API Server - Part 1
I have used below command to prepare Ubuntu Worker nodes. Instead of running below command one at a time you can download this bash script k8sinstall.sh here or it also available on github.com/janviudapi and Execute at once to prepare your system in one go.
Complete articles:
Configure Nginx Load Balancer for the Kubernetes API Server - Part 1
Install and configure Kubernetes cluster master nodes using kubeadm - Part 2
Install and configure Kubernetes cluster worker nodes using kubeadm - Part 3
#sudo root access on system
sudo su -

#Update and upgrade Ubuntu OS
apt-get update -y && apt-get upgrade -y

#Disable swap Kubernetes will give you errors and warnings
swapoff -a
#vim /etc/fstab
sed -i 's/.* none.* swap.* sw.*/#&/' /etc/fstab
#sudo sed -i '/.* none.* swap.* sw.*/s/^#//' /etc/fstab
cat /etc/fstab

#Install required packages
sudo apt-get install curl apt-transport-https vim wget ca-certificates gnupg lsb-release -y

#Enable bride network visible to kubernetes
lsmod | grep br_netfilter
modprobe br_netfilter
sysctl net.bridge.bridge-nf-call-iptables=1
lsmod | grep br_netfilter

#Docker Installation and configuration
curl -fsSL https://download.docker.com/linux/ubuntu/gpg | sudo gpg --dearmor -o /usr/share/keyrings/docker-archive-keyring.gpg

echo "deb [arch=$(dpkg --print-architecture) signed-by=/usr/share/keyrings/docker-archive-keyring.gpg] https://download.docker.com/linux/ubuntu \
$(lsb_release -cs) stable" | sudo tee /etc/apt/sources.list.d/docker.list > /dev/null

sudo apt-get update -y
sudo apt-get install docker-ce docker-ce-cli containerd.io -y

mkdir -p /etc/docker

cat <<EOF | sudo tee /etc/docker/daemon.json
{ "exec-opts": ["native.cgroupdriver=systemd"],
"log-driver": "json-file",
"log-opts":
{ "max-size": "100m" },
"storage-driver": "overlay2"
}
EOF

systemctl enable docker
systemctl restart docker
systemctl status docker | cat

mkdir -p /etc/containerd
containerd config default > /etc/containerd/config.toml
systemctl restart containerd

#Kubernetes k8s Installation
curl -s https://packages.cloud.google.com/apt/doc/apt-key.gpg | sudo apt-key add -
echo "deb https://apt.kubernetes.io/ kubernetes-xenial main" | sudo tee /etc/apt/sources.list.d/kubernetes.list
apt-get update -y
apt-get install kubectl kubeadm kubelet kubernetes-cni -y

#Enable Firewall to allow K8S API port
sudo ufw allow 6443
sudo ufw allow 6443/tcp
Make sure you have noted the kubeadm join link command from the first master node deployment while using kubeadm init for first time. This is join command is used on Worker Nodes.
root@k8smaster01:~#
root@k8smaster01:~# kubeadm init --pod-network-cidr=10.244.0.0/16 --control-plane-endpoint 192.168.34.60:6443 --upload-certs \
>     --apiserver-cert-extra-sans=*.vcloud-lab.com,127.0.0.1,k8smaster01,192.168.34.61,k8smaster02,192.168.34.62,k8smaster03,192.168.34.63
[init] Using Kubernetes version: v1.25.2
[preflight] Running pre-flight checks
[preflight] Pulling images required for setting up a Kubernetes cluster
[preflight] This might take a minute or two, depending on the speed of your internet connection
[preflight] You can also perform this action in beforehand using 'kubeadm config images pull'
[certs] Using certificateDir folder "/etc/kubernetes/pki"
[certs] Generating "ca" certificate and key
[certs] Generating "apiserver" certificate and key
[certs] apiserver serving cert is signed for DNS names [*.vcloud-lab.com k8smaster01 k8smaster02 k8smaster03 kubernetes kubernetes.default kubernetes.default.svc kubernetes.default.svc.cluster.local] and IPs [10.96.0.1 192.168.34.61 192.168.34.60 127.0.0.1 192.168.34.62 192.168.34.63]
[certs] Generating "apiserver-kubelet-client" certificate and key
[certs] Generating "front-proxy-ca" certificate and key
[certs] Generating "front-proxy-client" certificate and key
[certs] Generating "etcd/ca" certificate and key
[certs] Generating "etcd/server" certificate and key
[certs] etcd/server serving cert is signed for DNS names [k8smaster01 localhost] and IPs [192.168.34.61 127.0.0.1 ::1]
[certs] Generating "etcd/peer" certificate and key
[certs] etcd/peer serving cert is signed for DNS names [k8smaster01 localhost] and IPs [192.168.34.61 127.0.0.1 ::1]
[certs] Generating "etcd/healthcheck-client" certificate and key
[certs] Generating "apiserver-etcd-client" certificate and key
[certs] Generating "sa" key and public key
[kubeconfig] Using kubeconfig folder "/etc/kubernetes"
[kubeconfig] Writing "admin.conf" kubeconfig file
[kubeconfig] Writing "kubelet.conf" kubeconfig file
[kubeconfig] Writing "controller-manager.conf" kubeconfig file
[kubeconfig] Writing "scheduler.conf" kubeconfig file
[kubelet-start] Writing kubelet environment file with flags to file "/var/lib/kubelet/kubeadm-flags.env"
[kubelet-start] Writing kubelet configuration to file "/var/lib/kubelet/config.yaml"
[kubelet-start] Starting the kubelet
[control-plane] Using manifest folder "/etc/kubernetes/manifests"
[control-plane] Creating static Pod manifest for "kube-apiserver"
[control-plane] Creating static Pod manifest for "kube-controller-manager"
[control-plane] Creating static Pod manifest for "kube-scheduler"
[etcd] Creating static Pod manifest for local etcd in "/etc/kubernetes/manifests"
[wait-control-plane] Waiting for the kubelet to boot up the control plane as static Pods from directory "/etc/kubernetes/manifests". This can take up to 4m0s
[apiclient] All control plane components are healthy after 12.027646 seconds
[upload-config] Storing the configuration used in ConfigMap "kubeadm-config" in the "kube-system" Namespace
[kubelet] Creating a ConfigMap "kubelet-config" in namespace kube-system with the configuration for the kubelets in the cluster
[upload-certs] Storing the certificates in Secret "kubeadm-certs" in the "kube-system" Namespace
[upload-certs] Using certificate key:
abafd79e05f1089152ea4921eb38d5ccaf8c020adf3ce5bb0b3a9969962c9545
[mark-control-plane] Marking the node k8smaster01 as control-plane by adding the labels: [node-role.kubernetes.io/control-plane node.kubernetes.io/exclude-from-external-load-balancers]
[mark-control-plane] Marking the node k8smaster01 as control-plane by adding the taints [node-role.kubernetes.io/control-plane:NoSchedule]
[bootstrap-token] Using token: tpxbcw.sk0f43qcxzm5ky61
[bootstrap-token] Configuring bootstrap tokens, cluster-info ConfigMap, RBAC Roles
[bootstrap-token] Configured RBAC rules to allow Node Bootstrap tokens to get nodes
[bootstrap-token] Configured RBAC rules to allow Node Bootstrap tokens to post CSRs in order for nodes to get long term certificate credentials
[bootstrap-token] Configured RBAC rules to allow the csrapprover controller automatically approve CSRs from a Node Bootstrap Token
[bootstrap-token] Configured RBAC rules to allow certificate rotation for all node client certificates in the cluster
[bootstrap-token] Creating the "cluster-info" ConfigMap in the "kube-public" namespace
[kubelet-finalize] Updating "/etc/kubernetes/kubelet.conf" to point to a rotatable kubelet client certificate and key
[addons] Applied essential addon: CoreDNS
[addons] Applied essential addon: kube-proxy

Your Kubernetes control-plane has initialized successfully!

To start using your cluster, you need to run the following as a regular user:

  mkdir -p $HOME/.kube
  sudo cp -i /etc/kubernetes/admin.conf $HOME/.kube/config
  sudo chown $(id -u):$(id -g) $HOME/.kube/config

Alternatively, if you are the root user, you can run:

  export KUBECONFIG=/etc/kubernetes/admin.conf

You should now deploy a pod network to the cluster.
Run "kubectl apply -f [podnetwork].yaml" with one of the options listed at:
  https://kubernetes.io/docs/concepts/cluster-administration/addons/

You can now join any number of the control-plane node running the following command on each as root:

  kubeadm join 192.168.34.60:6443 --token tpxbcw.sk0f43qcxzm5ky61 \
        --discovery-token-ca-cert-hash sha256:031b7d3401ab07e651f93403b5364db16ea323cebf34a7772a473009ac5b1de3 \
        --control-plane --certificate-key abafd79e05f1089152ea4921eb38d5ccaf8c020adf3ce5bb0b3a9969962c9545

Please note that the certificate-key gives access to cluster sensitive data, keep it secret!
As a safeguard, uploaded-certs will be deleted in two hours; If necessary, you can use
"kubeadm init phase upload-certs --upload-certs" to reload certs afterward.

Then you can join any number of worker nodes by running the following on each as root:

kubeadm join 192.168.34.60:6443 --token tpxbcw.sk0f43qcxzm5ky61 \
        --discovery-token-ca-cert-hash sha256:031b7d3401ab07e651f93403b5364db16ea323cebf34a7772a473009ac5b1de3
Once I have my Ubuntu OS ready to join as worker nodes in control plane. I have the kubeadm join command link from kubeadm init which I will use to connect Worker nodes to control plane. But the token in link expires after 23 hours.

root@k8sworker01:~#
root@k8sworker01:~# kubeadm join 192.168.34.60:6443 --token tpxbcw.sk0f43qcxzm5ky61         --discovery-token-ca-cert-hash sha256:031b7d3401ab07e651f93403b5364db16ea323cebf34a7772a473009ac5b1de3
[preflight] Running pre-flight checks
error execution phase preflight: couldn't validate the identity of the API Server: could not find a JWS signature in the cluster-info ConfigMap for token ID "tpxbcw"
To see the stack trace of this error execute with --v=5 or higher
root@k8sworker01:~#
Incase if the token is expired, you can create a new one on any Master node by running command kubeadm token create --print-join-command.

root@k8smaster01:~#
root@k8smaster01:~# kubeadm token create --print-join-command
kubeadm join 192.168.34.60:6443 --token j1u0qk.u018y1nupk7qxg0x --discovery-token-ca-cert-hash sha256:031b7d3401ab07e651f93403b5364db16ea323cebf34a7772a473009ac5b1de3
root@k8smaster01:~#
Use the kubeadm join command on all prepared Ubuntu Worker nodes
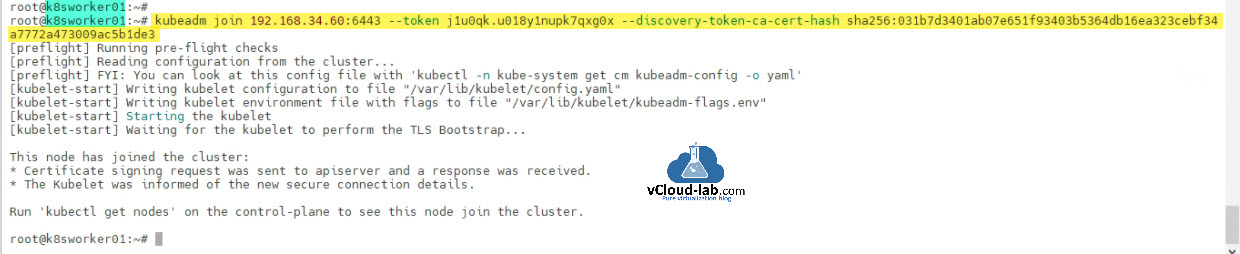
root@k8sworker01:~#
root@k8sworker01:~# kubeadm join 192.168.34.60:6443 --token j1u0qk.u018y1nupk7qxg0x --discovery-token-ca-cert-hash sha256:031b7d3401ab07e651f93403b5364db16ea323cebf34a7772a473009ac5b1de3
[preflight] Running pre-flight checks
[preflight] Reading configuration from the cluster...
[preflight] FYI: You can look at this config file with 'kubectl -n kube-system get cm kubeadm-config -o yaml'
[kubelet-start] Writing kubelet configuration to file "/var/lib/kubelet/config.yaml"
[kubelet-start] Writing kubelet environment file with flags to file "/var/lib/kubelet/kubeadm-flags.env"
[kubelet-start] Starting the kubelet
[kubelet-start] Waiting for the kubelet to perform the TLS Bootstrap...

This node has joined the cluster:
* Certificate signing request was sent to apiserver and a response was received.
* The Kubelet was informed of the new secure connection details.

Run 'kubectl get nodes' on the control-plane to see this node join the cluster.

root@k8sworker01:~#
Once worker nodes are joined into control-plane, go to any Master node and check the status of nodes using command kubectl get nodes. All looks good and my Kubernetes cluster is ready to rock and roll.
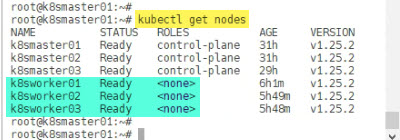
root@k8smaster01:~#
root@k8smaster01:~# kubectl get nodes
NAME          STATUS     ROLES           AGE   VERSION
k8smaster01   Ready      control-plane   26h   v1.25.2
k8smaster02   Ready      control-plane   26h   v1.25.2
k8smaster03   Ready      control-plane   23h   v1.25.2
k8sworker01   Ready      <none>          13m   v1.25.2
k8sworker02   Ready      <none>          66s   v1.25.2
k8sworker03   Ready      <none>          37s   v1.25.2
root@k8smaster01:~#
Useful Articles
How to install kubernetes master control-plane on ubuntu Part 1
How to install kubernetes worker node on ubuntu Part 2
ansible create an array with set_fact
Ansible get information from esxi advanced settings nested dictionary with unique keynames
Install Ansible AWX Tower on Ubuntu Linux
Ansible AWX installation error Cannot have both the docker-py and docker python modules
Ansible AWX installation error docker-compose run --rm --service-ports task awx-manage migrate --no-input
docker: Got permission denied while trying to connect to the Docker daemon socket
Ansible AWX Tower create Manual SCM (Source Control Credential Type) project
Reset Ansible AWX Tower admin password
Install Ansible AWX on Microsoft Windows OS
Step by Step Install Ansible on Ubuntu OS
Install Ansible AWX Tower on Ubuntu Linux OS
Ansible AWX Tower Github inventory integration | Github inventory source
