HashiCorp Packer.exe is an open source tool for building identical Virtual machine golden images for various platforms from a single source configuration. Packer is lightweight, runs on every major operating system, and is highly efficient, creating Master/Base machine images for several platforms in parallel.
This is last and final (3rd) part of How to use HashiCorp Packer to automate and create a Windows Server Virtual Machine template on VMware vCenter server. You can refer to below article and they are prerequisite.
Part 1: Inject and install VMware Tools During Install by modifying Microsoft Windows ISO
Part 2: Configure IIS server to allow download .ISO files
Part 3: Using HashiCorp Packer to build a Windows Server VM template for VMware vSphere
Why above article Part 1 is necessary, because when I tried to install Virtual Machine Template on vCenter Server with HashiCorp Packer, It was getting stuck/freeze indefinitely at the stage vsphere-iso.windows: Waiting for IP.... This happens because of VMware tools are missing in the Windows OS inside Virtual machine and packer is not able to get IP from vCenter VM details as they are not exposed without VMTools. For this reason I modified and customized Windows Server ISO to add/inject/slipstream VMware tools. So it is installed by default with Windows OS installation.
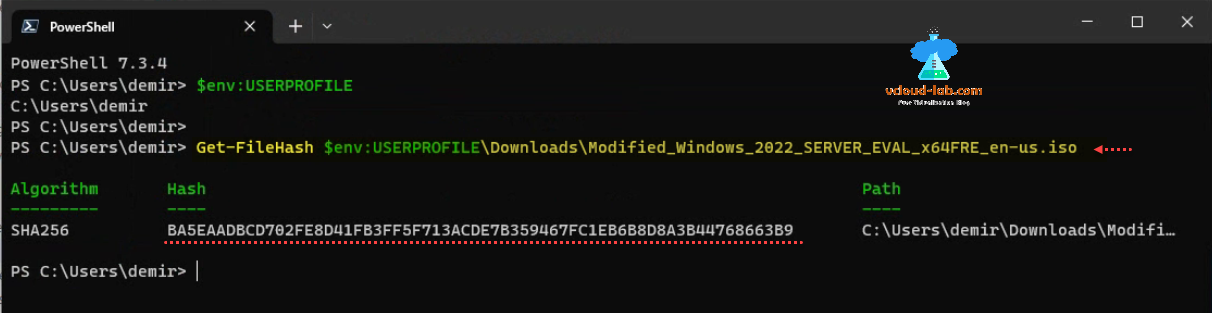
Before starting I need modified ISO file's hash/checksum value, which I can get with below PowerShell command. I have downloaded this modified ISO file from web server locally as shown in Step 2.
Get-FileHash $env:USERPROFILE\Downloads\Modified_Windows_2022_SERVER_EVAL_x64FRE_en-us.iso

Algorithm       Hash                                                                   Path
---------       ----                                                                   ----
SHA256          BA5EAADBCD702FE8D41FB3FF5F713ACDE7B359467FC1EB6B8D8A3B44768663B9       C:\Users\demir\Downloads\Modifi…
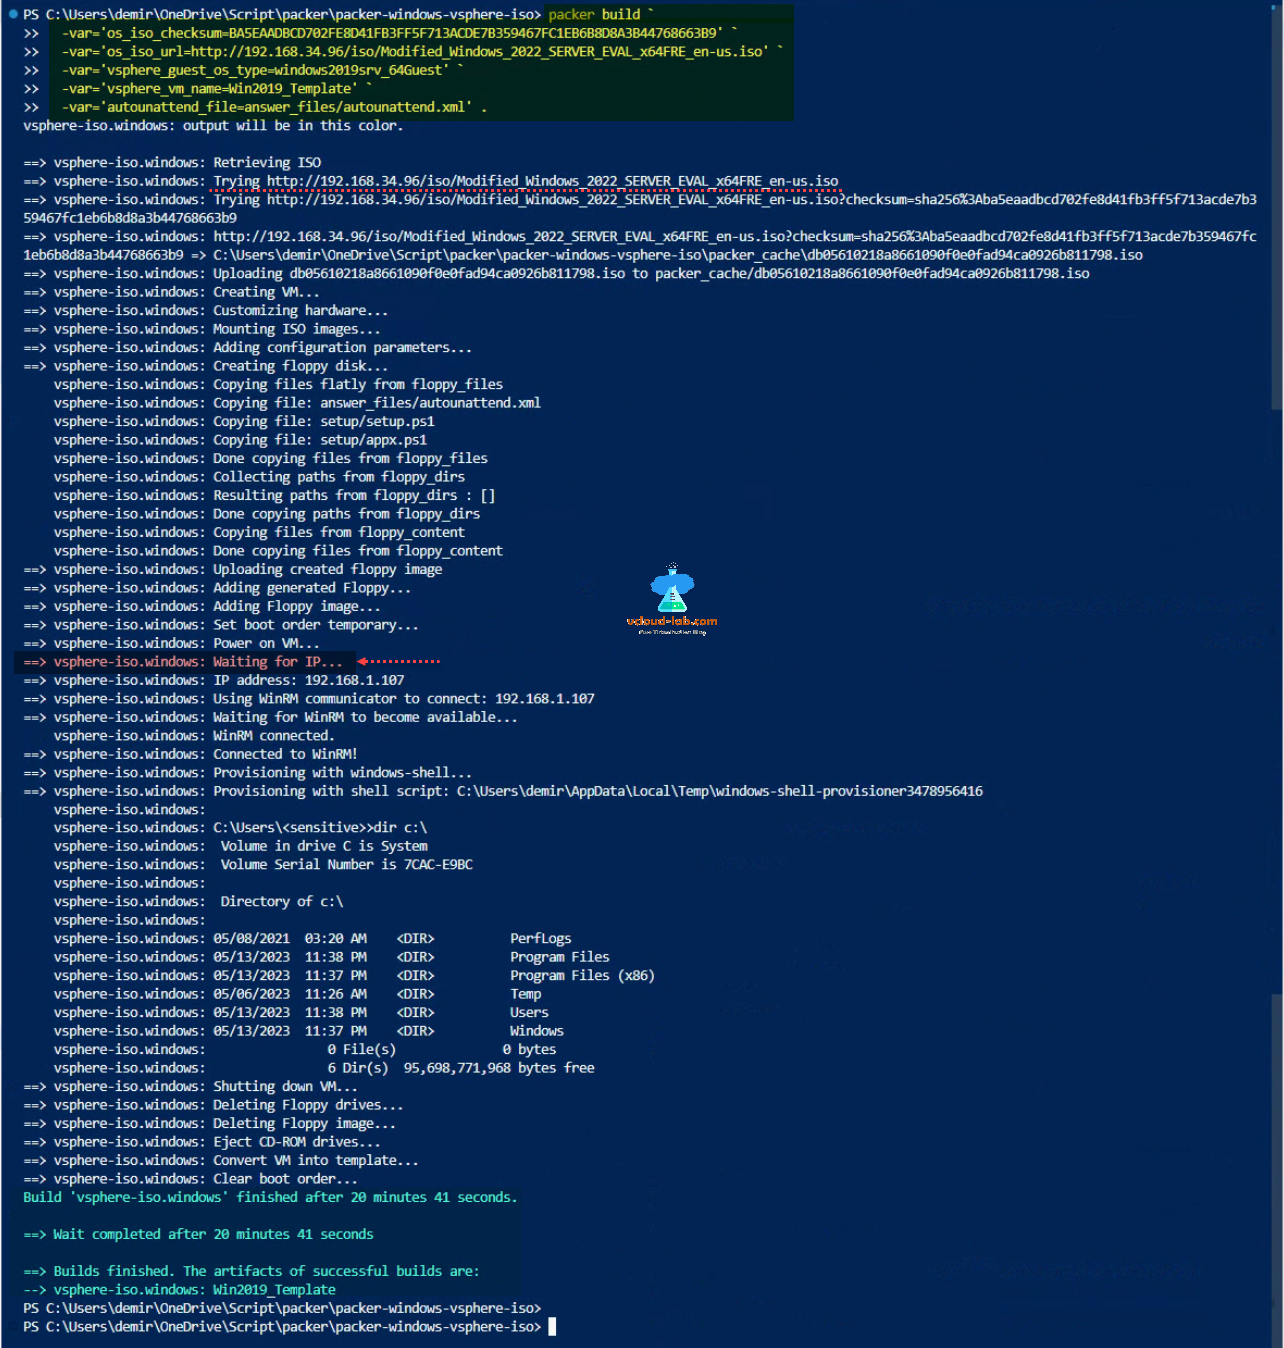
To deploy the new unattended template file you will need to use below highlighted text code in red, same content are there in PowerShell file Build-WindowsTemplate.ps1. For Windows guest OS type check https://docs.vmware.com/en/VMware-HCX/4.6/hcx-user-guide/GUID-D4FFCBD6-9FEC-44E5-9E26-1BD0A2A81389.html and use required value, for ISO checksum use above PowerShell script and for ISO URL you will need to follow Step 2.
In my case it took me around 21 minutes to deploy a new VM template on vCenter with just single packer command from scratch with all the defined configurations and scripts.
In the posted zip script bundle, download and extract it. You will need to modify 2 files as per your infrastructure environment details in Build-WindowsTemplate.ps1, variables.auto.pkrvars.hcl. To execute packer build run script Build-WindowsTemplate.ps1.
packer build `
   -var='os_iso_checksum=BA5EAADBCD702FE8D41FB3FF5F713ACDE7B359467FC1EB6B8D8A3B44768663B9' `
   -var='os_iso_url=http://192.168.34.96/iso/Modified_Windows_2022_SERVER_EVAL_x64FRE_en-us.iso' `
   -var='vsphere_guest_os_type=windows2019srv_64Guest' `
   -var='vsphere_vm_name=Win2019_Template' `
   -var='autounattend_file=answer_files/autounattend.xml' .

vsphere-iso.windows: output will be in this color.

==> vsphere-iso.windows: Retrieving ISO
==> vsphere-iso.windows: Trying http://192.168.34.96/iso/Modified_Windows_2022_SERVER_EVAL_x64FRE_en-us.iso
==> vsphere-iso.windows: Trying http://192.168.34.96/iso/Modified_Windows_2022_SERVER_EVAL_x64FRE_en-us.iso?checksum=sha256%3Aba5eaadbcd702fe8d41fb3ff5f713acde7b359467fc1eb6b8d8a3b44768663b9
==> vsphere-iso.windows: http://192.168.34.96/iso/Modified_Windows_2022_SERVER_EVAL_x64FRE_en-us.iso?checksum=sha256%3Aba5eaadbcd702fe8d41fb3ff5f713acde7b359467fc1eb6b8d8a3b44768663b9 => C:\Users\demir\OneDrive\Script\packer\packer-windows-vsphere-iso\packer_cache\db05610218a8661090f0e0fad94ca0926b811798.iso
==> vsphere-iso.windows: Uploading db05610218a8661090f0e0fad94ca0926b811798.iso to packer_cache/db05610218a8661090f0e0fad94ca0926b811798.iso
==> vsphere-iso.windows: Creating VM...
==> vsphere-iso.windows: Customizing hardware...
==> vsphere-iso.windows: Mounting ISO images...
==> vsphere-iso.windows: Adding configuration parameters...
==> vsphere-iso.windows: Creating floppy disk...
    vsphere-iso.windows: Copying files flatly from floppy_files
    vsphere-iso.windows: Copying file: answer_files/autounattend.xml
    vsphere-iso.windows: Copying file: setup/setup.ps1
    vsphere-iso.windows: Copying file: setup/appx.ps1
    vsphere-iso.windows: Done copying files from floppy_files
    vsphere-iso.windows: Collecting paths from floppy_dirs
    vsphere-iso.windows: Resulting paths from floppy_dirs : []
    vsphere-iso.windows: Done copying paths from floppy_dirs
    vsphere-iso.windows: Copying files from floppy_content
    vsphere-iso.windows: Done copying files from floppy_content
==> vsphere-iso.windows: Uploading created floppy image
==> vsphere-iso.windows: Adding generated Floppy...
==> vsphere-iso.windows: Adding Floppy image...
==> vsphere-iso.windows: Set boot order temporary...
==> vsphere-iso.windows: Power on VM...
==> vsphere-iso.windows: Waiting for IP...
==> vsphere-iso.windows: IP address: 192.168.1.107
==> vsphere-iso.windows: Using WinRM communicator to connect: 192.168.1.107
==> vsphere-iso.windows: Waiting for WinRM to become available...
    vsphere-iso.windows: WinRM connected.
==> vsphere-iso.windows: Connected to WinRM!
==> vsphere-iso.windows: Provisioning with windows-shell...
==> vsphere-iso.windows: Provisioning with shell script: C:\Users\demir\AppData\Local\Temp\windows-shell-provisioner3478956416
    vsphere-iso.windows:
    vsphere-iso.windows: C:\Users\<sensitive>>dir c:\
    vsphere-iso.windows:  Volume in drive C is System
    vsphere-iso.windows:  Volume Serial Number is 7CAC-E9BC
    vsphere-iso.windows:
    vsphere-iso.windows:  Directory of c:\
    vsphere-iso.windows:
    vsphere-iso.windows: 05/08/2021  03:20 AM    <DIR>          PerfLogs
    vsphere-iso.windows: 05/13/2023  11:38 PM    <DIR>          Program Files
    vsphere-iso.windows: 05/13/2023  11:37 PM    <DIR>          Program Files (x86)
    vsphere-iso.windows: 05/06/2023  11:26 AM    <DIR>          Temp
    vsphere-iso.windows: 05/13/2023  11:38 PM    <DIR>          Users
    vsphere-iso.windows: 05/13/2023  11:37 PM    <DIR>          Windows
    vsphere-iso.windows:                0 File(s)              0 bytes
    vsphere-iso.windows:                6 Dir(s)  95,698,771,968 bytes free
==> vsphere-iso.windows: Shutting down VM...
==> vsphere-iso.windows: Deleting Floppy drives...
==> vsphere-iso.windows: Deleting Floppy image...
==> vsphere-iso.windows: Eject CD-ROM drives...
==> vsphere-iso.windows: Convert VM into template...
==> vsphere-iso.windows: Clear boot order...
Build 'vsphere-iso.windows' finished after 20 minutes 41 seconds.

==> Wait completed after 20 minutes 41 seconds

==> Builds finished. The artifacts of successful builds are:
--> vsphere-iso.windows: Win2019_Template
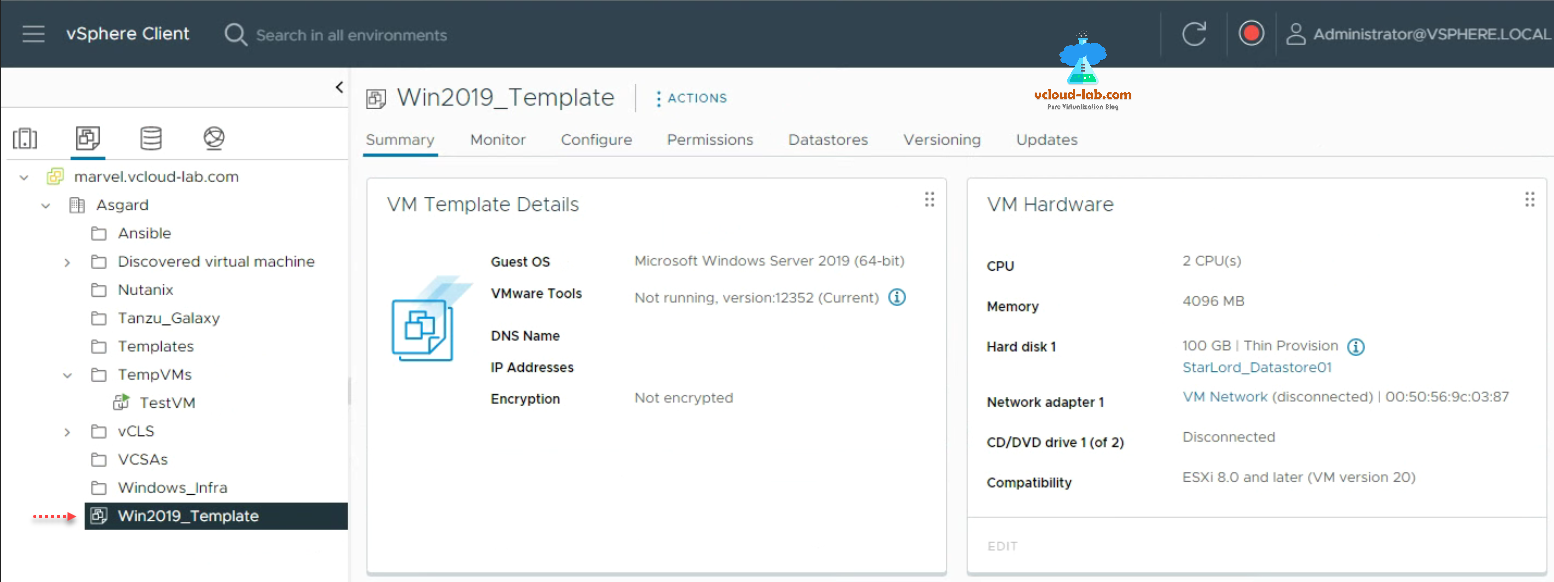
You can verify new VM template is created on vCenter server, further you can test creating a new Virtual Machine from this template.
Download here zip bundle for Packer script bundle for windows or this script is also available on github.com/janviudapi.
1 2 3 4 5 6 7 8 9 10 11 12 13 14 15 16 17 18 19 20 21 22 23 24 25 26 27 28 29 30 31 32 33 34 35 36 37 38 39 40 41 42 43 44 45 46 47 48 49 50 51 52 53 54 55 56 57 58 59 60 61 62 63 64 65 66 67 68 69 70 71 72 73 74 75 76 77 78 79 80 81 82 83 84 85 86 87 88 89 90 91 92 93 94 95 96 97 98 99 100 101 102 103 104 105 106 107 108 109 110 111 112 113 114 115 116 117 118 119 120 121 122 123 124 125 126 127 128 129 130 131 132 133 134 135 136 137 138 139 140 141 142 143 144 145 146 147 148 149 150 151 152 153 154 155 156 157 158 159 160 161 162 163 164 165 166 167 168 169 170 171 172 173 174 175 176 177 178 179 180 181 182 183 184 185 186 187 188 189 190 191 192 193 194 195 196 197 198 199 200 201 202 203 204 205 206 207 208 209 210 211 212 213 214 215 216 217 218 219 220 221 222 223 224 225 226 227 228 229 230 231 232 233 234 235 236 237 238 239 240 241 242 243 244 245 246 247 248 249 250 251 252 253 254 255 256 257 258 259 260 261 262 263 264 265 266 267 268 269 270 271 272 273 274 275 276 277 278 279 280 281 282 283 284 285 286 287 288 289 290 291 292 293 294 295 296 297 298 299 300 301 302 303 304 305 306 307 308 309 310 311 312 313 314 315 316 317 318 319 320 321 322 323 324 325 326 327 328 329 330 331 332 333 334 335 336 337 338 339 340 341 342 343 344 345 346 347 348 349 350 351 352 353 354 355 356 357 358 359 360 361 362 363 364 365 366 367 368 369 370 371 372 373 374 375 376 377 378 379 380 381 382 383 384 385 386 387 388 389 390 391 392 393 394 395 396 397 398 399 400 401 402 403 404 405 406 407 408 409 410 411 412 413 414 |
##### .\answer_files\autounattend.xml ##### <?xml version="1.0" encoding="utf-8"?> <unattend xmlns="urn:schemas-microsoft-com:unattend"> <settings pass="windowsPE"> <component name="Microsoft-Windows-International-Core-WinPE" processorArchitecture="amd64" publicKeyToken="31bf3856ad364e35" language="neutral" versionScope="nonSxS" xmlns:wcm="http://schemas.microsoft.com/WMIConfig/2002/State" xmlns:xsi="http://www.w3.org/2001/XMLSchema-instance"> <SetupUILanguage> <UILanguage>en-US</UILanguage> </SetupUILanguage> <InputLocale>0409:00000409</InputLocale> <SystemLocale>en-US</SystemLocale> <UILanguage>en-US</UILanguage> <UILanguageFallback>en-US</UILanguageFallback> <UserLocale>en-US</UserLocale> </component> <component name="Microsoft-Windows-PnpCustomizationsWinPE" processorArchitecture="amd64" publicKeyToken="31bf3856ad364e35" language="neutral" versionScope="nonSxS" xmlns:wcm="http://schemas.microsoft.com/WMIConfig/2002/State" xmlns:xsi="http://www.w3.org/2001/XMLSchema-instance"> <DriverPaths> <PathAndCredentials wcm:action="add" wcm:keyValue="A"> <!-- pvscsi-Windows8.flp --> <Path>B:\</Path> </PathAndCredentials> </DriverPaths> </component> <component name="Microsoft-Windows-Setup" processorArchitecture="amd64" publicKeyToken="31bf3856ad364e35" language="neutral" versionScope="nonSxS" xmlns:wcm="http://schemas.microsoft.com/WMIConfig/2002/State" xmlns:xsi="http://www.w3.org/2001/XMLSchema-instance"> <DiskConfiguration> <Disk wcm:action="add"> <CreatePartitions> <CreatePartition wcm:action="add"> <Size>250</Size> <Order>1</Order> <Type>Primary</Type> </CreatePartition> <CreatePartition wcm:action="add"> <Order>2</Order> <Extend>true</Extend> <Type>Primary</Type> </CreatePartition> </CreatePartitions> <ModifyPartitions> <ModifyPartition wcm:action="add"> <Order>1</Order> <PartitionID>1</PartitionID> <Format>NTFS</Format> <Label>Boot</Label> <Active>true</Active> </ModifyPartition> <ModifyPartition wcm:action="add"> <Order>2</Order> <PartitionID>2</PartitionID> <Format>NTFS</Format> <Label>System</Label> </ModifyPartition> </ModifyPartitions> <DiskID>0</DiskID> <WillWipeDisk>true</WillWipeDisk> </Disk> </DiskConfiguration> <ImageInstall> <OSImage> <InstallFrom> <MetaData wcm:action="add"> <Key>/IMAGE/INDEX</Key> <Value>4</Value> </MetaData> </InstallFrom> <InstallTo> <DiskID>0</DiskID> <PartitionID>2</PartitionID> </InstallTo> <WillShowUI>OnError</WillShowUI> <InstallToAvailablePartition>false</InstallToAvailablePartition> </OSImage> </ImageInstall> <UserData> <AcceptEula>true</AcceptEula> <!-- <ProductKey> <WillShowUI>Never</WillShowUI> <Key>WX4NM-KYWYW-QJJR4-XV3QB-6VM33</Key> </ProductKey> --> </UserData> </component> </settings> <settings pass="offlineServicing"> <component name="Microsoft-Windows-LUA-Settings" processorArchitecture="amd64" publicKeyToken="31bf3856ad364e35" language="neutral" versionScope="nonSxS" xmlns:wcm="http://schemas.microsoft.com/WMIConfig/2002/State" xmlns:xsi="http://www.w3.org/2001/XMLSchema-instance"> <!-- Disable user account control --> <EnableLUA>false</EnableLUA> </component> </settings> <settings pass="specialize"> <component name="Microsoft-Windows-Shell-Setup" processorArchitecture="amd64" publicKeyToken="31bf3856ad364e35" language="neutral" versionScope="nonSxS" xmlns:wcm="http://schemas.microsoft.com/WMIConfig/2002/State" xmlns:xsi="http://www.w3.org/2001/XMLSchema-instance"> <TimeZone>Central Standard Time</TimeZone> </component> <component name="Microsoft-Windows-TerminalServices-LocalSessionManager" processorArchitecture="amd64" publicKeyToken="31bf3856ad364e35" language="neutral" versionScope="nonSxS" xmlns:wcm="http://schemas.microsoft.com/WMIConfig/2002/State" xmlns:xsi="http://www.w3.org/2001/XMLSchema-instance"> <fDenyTSConnections>false</fDenyTSConnections> </component> <component name="Networking-MPSSVC-Svc" processorArchitecture="amd64" publicKeyToken="31bf3856ad364e35" language="neutral" versionScope="nonSxS" xmlns:wcm="http://schemas.microsoft.com/WMIConfig/2002/State" xmlns:xsi="http://www.w3.org/2001/XMLSchema-instance"> <FirewallGroups> <FirewallGroup wcm:action="add" wcm:keyValue="RemoteDesktop"> <Active>true</Active> <Group>Remote Desktop</Group> <Profile>all</Profile> </FirewallGroup> </FirewallGroups> </component> <component name="Microsoft-Windows-TerminalServices-RDP-WinStationExtensions" processorArchitecture="amd64" publicKeyToken="31bf3856ad364e35" language="neutral" versionScope="nonSxS" xmlns:wcm="http://schemas.microsoft.com/WMIConfig/2002/State" xmlns:xsi="http://www.w3.org/2001/XMLSchema-instance"> <SecurityLayer>2</SecurityLayer> <UserAuthentication>1</UserAuthentication> </component> <component name="Microsoft-Windows-ServerManager-SvrMgrNc" processorArchitecture="amd64" publicKeyToken="31bf3856ad364e35" language="neutral" versionScope="nonSxS" xmlns:wcm="http://schemas.microsoft.com/WMIConfig/2002/State" xmlns:xsi="http://www.w3.org/2001/XMLSchema-instance"> <DoNotOpenServerManagerAtLogon>true</DoNotOpenServerManagerAtLogon> </component> <component name="Microsoft-Windows-OutOfBoxExperience" processorArchitecture="amd64" publicKeyToken="31bf3856ad364e35" language="neutral" versionScope="nonSxS" xmlns:wcm="http://schemas.microsoft.com/WMIConfig/2002/State" xmlns:xsi="http://www.w3.org/2001/XMLSchema-instance"> <DoNotOpenInitialConfigurationTasksAtLogon>true</DoNotOpenInitialConfigurationTasksAtLogon> </component> <component name="Microsoft-Windows-Security-SPP-UX" processorArchitecture="amd64" publicKeyToken="31bf3856ad364e35" language="neutral" versionScope="nonSxS" xmlns:wcm="http://schemas.microsoft.com/WMIConfig/2002/State" xmlns:xsi="http://www.w3.org/2001/XMLSchema-instance"> <SkipAutoActivation>true</SkipAutoActivation> </component> </settings> <settings pass="oobeSystem"> <component name="Microsoft-Windows-Shell-Setup" processorArchitecture="amd64" publicKeyToken="31bf3856ad364e35" language="neutral" versionScope="nonSxS" xmlns:wcm="http://schemas.microsoft.com/WMIConfig/2002/State" xmlns:xsi="http://www.w3.org/2001/XMLSchema-instance"> <AutoLogon> <Password> <Value>vagrant</Value> <PlainText>true</PlainText> </Password> <LogonCount>2</LogonCount> <Username>vagrant</Username> <Enabled>true</Enabled> </AutoLogon> <FirstLogonCommands> <SynchronousCommand wcm:action="add"> <CommandLine>%SystemRoot%\System32\reg.exe ADD HKCU\SOFTWARE\Microsoft\Windows\CurrentVersion\Explorer\Advanced\ /v HideFileExt /t REG_DWORD /d 0 /f</CommandLine> <Order>1</Order> <Description>Show file extensions in Explorer</Description> </SynchronousCommand> <SynchronousCommand wcm:action="add"> <CommandLine>cmd.exe /c wmic useraccount where "name='vagrant'" set PasswordExpires=FALSE</CommandLine> <Order>2</Order> <Description>Disable password expiration for vagrant user</Description> </SynchronousCommand> <SynchronousCommand wcm:action="add"> <Order>3</Order> <CommandLine>powershell -ExecutionPolicy Bypass -File a:\setup.ps1</CommandLine> <Description>Enable WinRM service</Description> <RequiresUserInput>true</RequiresUserInput> </SynchronousCommand> </FirstLogonCommands> <OOBE> <HideEULAPage>true</HideEULAPage> <HideLocalAccountScreen>true</HideLocalAccountScreen> <HideOEMRegistrationScreen>true</HideOEMRegistrationScreen> <HideOnlineAccountScreens>true</HideOnlineAccountScreens> <HideWirelessSetupInOOBE>true</HideWirelessSetupInOOBE> <NetworkLocation>Home</NetworkLocation> <ProtectYourPC>1</ProtectYourPC> </OOBE> <UserAccounts> <AdministratorPassword> <Value>vagrant</Value> <PlainText>true</PlainText> </AdministratorPassword> <LocalAccounts> <LocalAccount wcm:action="add"> <Password> <Value>vagrant</Value> <PlainText>true</PlainText> </Password> <Group>administrators</Group> <DisplayName>vagrant</DisplayName> <Name>vagrant</Name> <Description>Vagrant User</Description> </LocalAccount> </LocalAccounts> </UserAccounts> </component> </settings> <cpi:offlineImage cpi:source="wim:c:/wims/install.wim#Windows Server 2022 SERVERDATACENTER" xmlns:cpi="urn:schemas-microsoft-com:cpi" /> </unattend> ##### .\setup\appx.ps1 ##### Get-AppXPackage | Where {($_.NonRemovable -eq $false) -and ($_.IsFramework -eq $false)} | Remove-AppXPackage -ErrorAction SilentlyContinue ##### .\setup\setup.ps1 ##### $ErrorActionPreference = "Stop" # Switch network connection to private mode # Required for WinRM firewall rules $profile = Get-NetConnectionProfile Set-NetConnectionProfile -Name $profile.Name -NetworkCategory Private # WinRM Configure winrm quickconfig -quiet winrm set winrm/config/service '@{AllowUnencrypted="true"}' winrm set winrm/config/service/auth '@{Basic="true"}' netsh advfirewall firewall add rule name="Windows Remote Managment (HTTP-In)" dir=in action=allow protocol=TCP localport=5985 # Reset auto logon count # https://docs.microsoft.com/en-us/windows-hardware/customize/desktop/unattend/microsoft-windows-shell-setup-autologon-logoncount#logoncount-known-issue Set-ItemProperty -Path 'HKLM:\SOFTWARE\Microsoft\Windows NT\CurrentVersion\Winlogon' -Name AutoLogonCount -Value 0 ##### variables.auto.pkvars.hcl ##### # Name or IP of you vCenter Server vsphere_server = "marvel.vcloud-lab.com" # vsphere username vsphere_username = "administrator@vsphere.local" # vsphere password vsphere_password = "Computer@123" # vsphere datacenter name vsphere_datacenter = "Asgard" # name or IP of the ESXi host vsphere_host = "marvel.vcloud-lab.com" # vsphere network vsphere_network = "VM Network" # vsphere datastore vsphere_datastore = "StarLord_Datastore01" # datastore path to the vmtools iso file (You can download VMware Tools packages for Windows here (.zip file): https://customerconnect.vmware.com/en/downloads/details?downloadGroup=VMTOOLS1135&productId=1073&rPId=74478) vmtools_iso_path = "[StarLord_Datastore01] iso/windows.iso" # datastore path to the floppy image for virtual iSCSI drivers (part of VM Tools, see above) floppy_pvscsi = "[StarLord_Datastore01] floppies/pvscsi-Windows8.flp" # Windows username (created in autounattend.xml. If you change it here the please also adjust in all autounattend.xml) winrm_password = "vagrant" # Windows password (created in autounattend.xml. If you change it here the please also adjust in all autounattend.xml) winrm_username = "vagrant" ##### windows.pkr.hcl ##### packer { required_plugins { vsphere = { version = ">= 0.0.1" source = "github.com/hashicorp/vsphere" } # if you would like to automatically install window updates, then uncomment # the following section. Please also uncomment Line 163-170 # windows-update = { # version = "0.14.0" # source = "github.com/rgl/windows-update" # } } } variable "autounattend_file" { type = string default = "" } variable "cpu_num" { type = number default = 2 } variable "disk_size" { type = number default = 102400 } variable "mem_size" { type = number default = 4096 } variable "os_iso_checksum" { type = string default = "" } variable "os_iso_url" { type = string default = "" } variable "vmtools_iso_path" { type = string default = "" } variable "floppy_pvscsi" { type = string default = "" } variable "vsphere_datastore" { type = string default = "" } variable "vsphere_datacenter" { type = string default = "" } variable "vsphere_guest_os_type" { type = string default = "" } variable "vsphere_host" { type = string default = "" } variable "vsphere_password" { type = string default = "" sensitive = true } variable "vsphere_network" { type = string default = "" } variable "vsphere_server" { type = string default = "" } variable "vsphere_vm_name" { type = string default = "" } variable "vsphere_username" { type = string default = "" } variable "winrm_password" { type = string default = "" sensitive = true } variable "winrm_username" { type = string default = "" } source "vsphere-iso" "windows" { vcenter_server = "${var.vsphere_server}" host = "${var.vsphere_host}" username = "${var.vsphere_username}" password = "${var.vsphere_password}" insecure_connection = "true" datacenter = "${var.vsphere_datacenter}" datastore = "${var.vsphere_datastore}" CPUs = "${var.cpu_num}" RAM = "${var.mem_size}" RAM_reserve_all = true disk_controller_type = ["pvscsi"] # firmware = "bios" floppy_files = ["${var.autounattend_file}", "setup/setup.ps1", "setup/appx.ps1"] floppy_img_path = "${var.floppy_pvscsi}" guest_os_type = "${var.vsphere_guest_os_type}" iso_checksum = "${var.os_iso_checksum}" iso_url = "${var.os_iso_url}" iso_paths = ["${var.vmtools_iso_path}"] network_adapters { network = "${var.vsphere_network}" network_card = "vmxnet3" } storage { disk_size = "${var.disk_size}" disk_thin_provisioned = true } vm_name = "${var.vsphere_vm_name}" convert_to_template = "true" communicator = "winrm" winrm_username = "${var.winrm_username}" winrm_password = "${var.winrm_password}" winrm_timeout = "3h" shutdown_timeout = "60m" ip_wait_timeout = "3h" ip_settle_timeout = "2m" } build { sources = ["source.vsphere-iso.windows"] # if you would like to automatically install window updates, then uncomment # the following section. Please also uncomment Line 11-14 # provisioner "windows-update" { # search_criteria = "IsInstalled=0" # filters = [ # "exclude:$_.Title -like '*Preview*'", # "include:$true", # ] # update_limit = 25 # } provisioner "windows-shell" { inline = ["dir c:\\"] } } |
Useful Articles
Ansible for VMwary Using vmware_vm_inventory dynamic inventory plugin
Ansible selectattr The error was TemplateRuntimeError no test named 'equalto'
ansible create an array with set_fact
Ansible get information from esxi advanced settings nested dictionary with unique keynames
Install Ansible AWX Tower on Ubuntu Linux
Ansible AWX installation error Cannot have both the docker-py and docker python modules
Ansible AWX installation error docker-compose run --rm --service-ports task awx-manage migrate --no-input
docker: Got permission denied while trying to connect to the Docker daemon socket
Ansible AWX Tower create Manual SCM (Source Control Credential Type) project
Reset Ansible AWX Tower admin password
Install Ansible AWX on Microsoft Windows OS
Step by Step Install Ansible on Ubuntu OS
Install Ansible AWX Tower on Ubuntu Linux OS
Ansible AWX Tower Github inventory integration | Github inventory source
