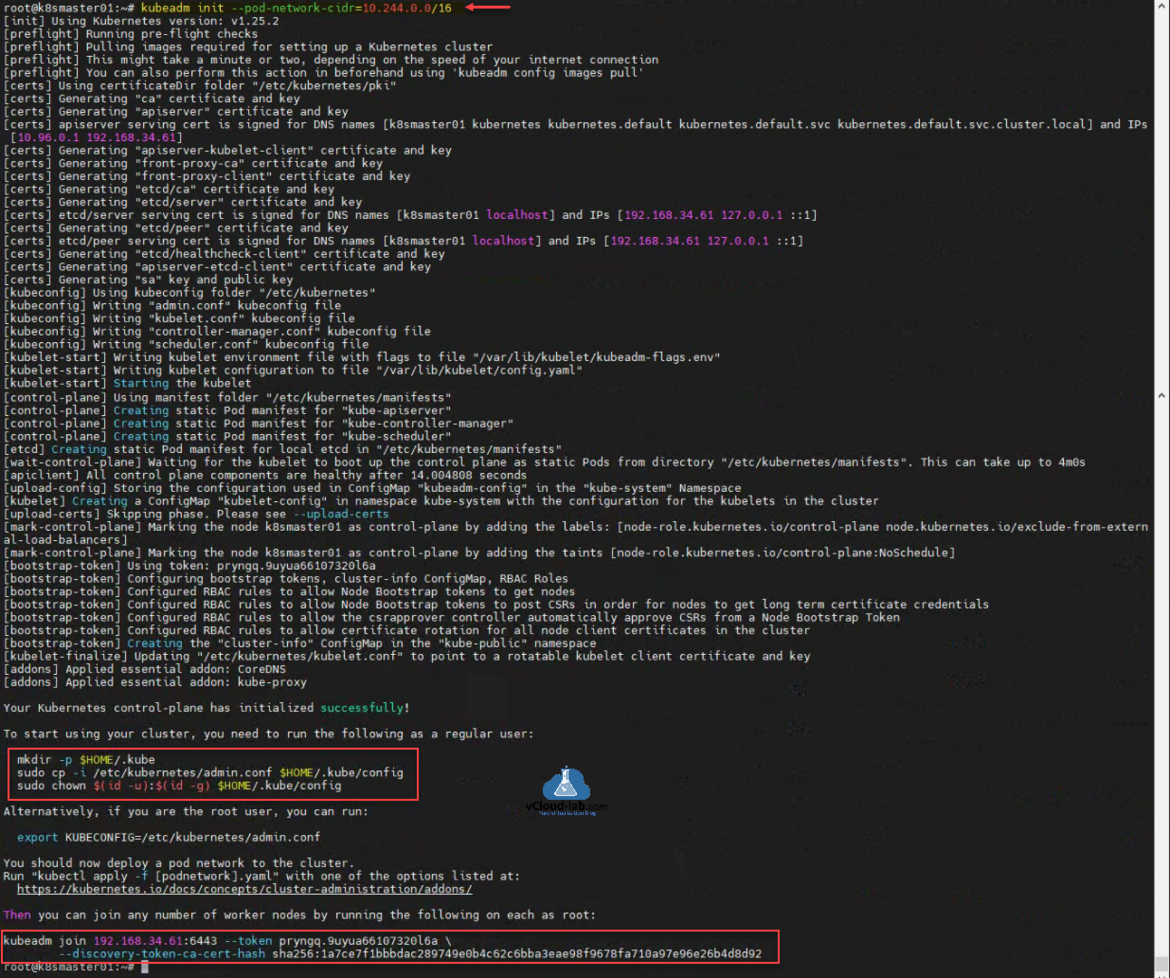
This is a second part of How to install kubernetes master control-plane on ubuntu. In the Part 1 I made my master node ready. If you are following the article, after executing kubeadm init command you will receive kubeadm join command which you need to use on K8S prepared worker node. Below is the screenshot from earlier article when I initiated kubeadm, and you can see the joining information in the bottom, This command need to be executed on worker node.
A Node is a worker machine in Kubernetes and can be both a virtual or a physical machine, varying on the cluster. Each Node is handled by the control plane. A Node can have several pods, and the Kubernetes control plane automatically manages scheduling the pods across the Nodes in the cluster.
Before proceeding first prepare K8S worker node using below commands. Install and configure necessary pacakges, softwares and OS settings.
#sudo root access on system
sudo su -

#Update and upgrade Ubuntu OS
apt-get update -y && apt-get upgrade -y

#Disable swap Kubernetes will give you errors and warnings
swapoff -a
#vim /etc/fstab
sed -i 's/.* none.* swap.* sw.*/#&/' /etc/fstab
#sudo sed -i '/.* none.* swap.* sw.*/s/^#//' /etc/fstab
cat /etc/fstab

#Install required packages
sudo apt-get install curl apt-transport-https vim wget ca-certificates gnupg lsb-release -y

#Enable bride network visible to kubernetes
lsmod | grep br_netfilter
modprobe br_netfilter
sysctl net.bridge.bridge-nf-call-iptables=1
lsmod | grep br_netfilter

#Docker Installation and configuration
curl -fsSL https://download.docker.com/linux/ubuntu/gpg | sudo gpg --dearmor -o /usr/share/keyrings/docker-archive-keyring.gpg
echo "deb [arch=$(dpkg --print-architecture) signed-by=/usr/share/keyrings/docker-archive-keyring.gpg] https://download.docker.com/linux/ubuntu \
$(lsb_release -cs) stable" | sudo tee /etc/apt/sources.list.d/docker.list > /dev/null
sudo apt-get update -y
sudo apt-get install docker-ce docker-ce-cli containerd.io -y

mkdir -p /etc/docker

cat <<EOF | sudo tee /etc/docker/daemon.json
{ "exec-opts": ["native.cgroupdriver=systemd"],
"log-driver": "json-file",
"log-opts":
{ "max-size": "100m" },
"storage-driver": "overlay2"
}
EOF

systemctl enable docker
systemctl restart docker
systemctl status docker

mkdir -p /etc/containerd
containerd config default > /etc/containerd/config.toml
systemctl restart containerd

#Kubernetes k8s Installation
curl -s https://packages.cloud.google.com/apt/doc/apt-key.gpg | sudo apt-key add -
echo "deb https://apt.kubernetes.io/ kubernetes-xenial main" | sudo tee /etc/apt/sources.list.d/kubernetes.list
apt-get update -y
apt-get install kubectl kubeadm kubelet kubernetes-cni -y

#Enable Firewall to allow K8S API port
sudo ufw allow 6443
sudo ufw allow 6443/tcp
Once the configuration of worker node is completed, use and run kubeadm join command which we received from the kubeadm init command from master node. The join token will expire after 23 hours. If kubeadm join token is expired generate one on Master node using command kubeadm token create --print-join-command, you can list the existing tokens using command kubeadm token list. CA cert hash value is common in all discovery token ca certificate hash.

root@k8smaster01:~# kubeadm token list
root@k8smaster01:~#
root@k8smaster01:~# kubeadm token create --print-join-command
kubeadm join 192.168.34.61:6443 --token d067o6.6t4njfpu5gcndz60 --discovery-token-ca-cert-hash sha256:1a7ce7f1bbbdac289749e0b4c62c6bba3eae98f9678fa710a97e96e26b4d8d92
root@k8smaster01:~# kubeadm token list
TOKEN                     TTL         EXPIRES                USAGES                   DESCRIPTION                                                EXTRA GROUPS
d067o6.6t4njfpu5gcndz60   23h         2022-09-28T17:10:08Z   authentication,signing   <none>                                                     system:bootstrappers:kubeadm:default-node-token
root@k8smaster01:~#
Once I have the join command from master node, Go to the prepared worker node to execute kubeadm setup, run sudo su - to get root access, run the kubeadm join command as shown below. Go to control-plane master node and run 'kubectl get nodes' command to see if worker node is joined in the cluster.

ubuntu@k8sworker01:~$ sudo su -
root@k8sworker01:~#
root@k8sworker01:~# kubeadm join 192.168.34.61:6443 --token d067o6.6t4njfpu5gcndz60 --discovery-token-ca-cert-hash sha256:1a7ce7f1bbbdac289749e0b4c62c6bba3eae98f9678fa710a97e96e26b4d8d92
[preflight] Running pre-flight checks
[preflight] Reading configuration from the cluster...
[preflight] FYI: You can look at this config file with 'kubectl -n kube-system get cm kubeadm-config -o yaml'
[kubelet-start] Writing kubelet configuration to file "/var/lib/kubelet/config.yaml"
[kubelet-start] Writing kubelet environment file with flags to file "/var/lib/kubelet/kubeadm-flags.env"
[kubelet-start] Starting the kubelet
[kubelet-start] Waiting for the kubelet to perform the TLS Bootstrap...

This node has joined the cluster:
* Certificate signing request was sent to apiserver and a response was received.
* The Kubelet was informed of the new secure connection details.

Run 'kubectl get nodes' on the control-plane to see this node join the cluster.

root@k8sworker01:~#
Here I am again on the Kubernetes master node. After running the command kubectl get nodes, I see worker node is ready and running added to cluster. Next for further test I created a test pod with command kubectl run nginx --image=nginx. There is a message pod/nginx created. Although pod is created but it doesn't mean it is successfully completed. To check the status of pod use command kubectl get pod -o wide. Status of pod is running and its deployed on the worker node.
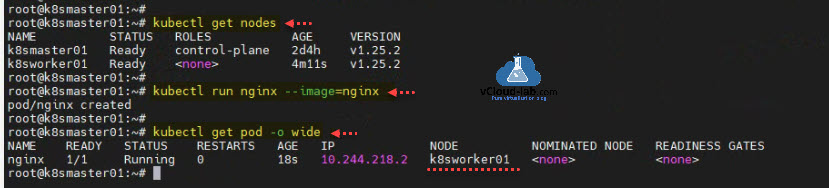
root@k8smaster01:~#
root@k8smaster01:~# kubectl get nodes
NAME          STATUS   ROLES           AGE     VERSION
k8smaster01   Ready    control-plane   2d4h    v1.25.2
k8sworker01   Ready    <none>          4m11s   v1.25.2
root@k8smaster01:~#
root@k8smaster01:~# kubectl run nginx --image=nginx
pod/nginx created
root@k8smaster01:~#
root@k8smaster01:~# kubectl get pod -o wide
NAME    READY   STATUS    RESTARTS   AGE   IP             NODE          NOMINATED NODE   READINESS GATES
nginx   1/1     Running   0          18s   10.244.218.2   k8sworker01   <none>           <none>
root@k8smaster01:~#
Useful Articles
ansible create an array with set_fact
Ansible get information from esxi advanced settings nested dictionary with unique keynames
Install Ansible AWX Tower on Ubuntu Linux
Ansible AWX installation error Cannot have both the docker-py and docker python modules
Ansible AWX installation error docker-compose run --rm --service-ports task awx-manage migrate --no-input
docker: Got permission denied while trying to connect to the Docker daemon socket
Ansible AWX Tower create Manual SCM (Source Control Credential Type) project
Reset Ansible AWX Tower admin password
Install Ansible AWX on Microsoft Windows OS
Step by Step Install Ansible on Ubuntu OS
Install Ansible AWX Tower on Ubuntu Linux OS
Ansible AWX Tower Github inventory integration | Github inventory source
