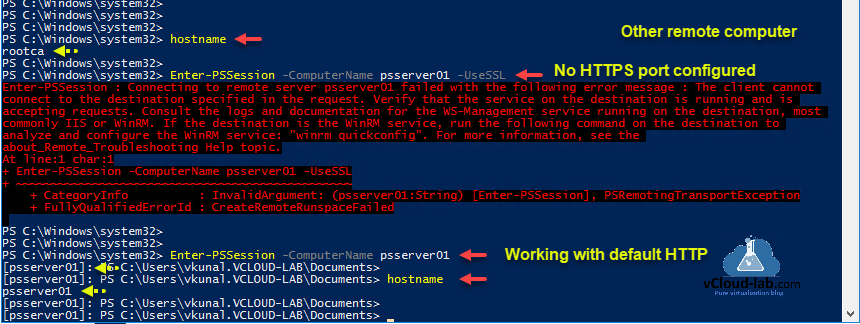
This is a step by step guide and will show you how to use HTTPS port and self signed SSL certificate while using Powershell Remoting. On the PSRemoting regards I had already written one article in the past POWERSHELL PS REMOTING BETWEEN STANDALONE WORKGROUP COMPUTERS, When you use WinRM PSRemoting, it uses default HTTP 5985 port for connection and SSL is not used, If I try to use Enter-PSSession command with -UseSSL syntax which Indicates that it will use Secure Sockets Layer (SSL) protocol to establish a connection to the remote computer. WS-Management encrypts all Windows PowerShell content transmitted over the network. If you use this parameter, but SSL is not configured, the command fails with below error.
Enter-PSSession -ComputerName <FQDN_IP> -UseSSL
Enter-PSSession : Connecting to remote server psserver01 failed with the following error message : The client cannot
connect to the destination specified in the request. Verify that the service on the destination is running and is
accepting requests. Consult the logs and documentation for the WS-Management service running on the destination, most
commonly IIS or WinRM. If the destination is the WinRM service, run the following command on the destination to
analyze and configure the WinRM service: "winrm quickconfig". For more information, see the
about_Remote_Troubleshooting Help topic.
At line:1 char:1
+ Enter-PSSession -ComputerName psserver01 -UseSSL
+ ~~~~~~~~~~~~~~~~~~~~~~~~~~~~~~~~~~~~~~~~~~~~~~~~
+ CategoryInfo : InvalidArgument: (psserver01:String) [Enter-PSSession], PSRemotingTransportException
+ FullyQualifiedErrorId : CreateRemoteRunspaceFailed
Series
POWERSHELL PS REMOTING BETWEEN STANDALONE WORKGROUP COMPUTERS
PowerShell remoting over HTTPS using self-signed SSL certificate
Configure Powershell WinRM to use OpenSSL generated Self-Signed certificate
Powershell WinRM HTTPs CA signed certificate configuration
Powershell Generate Self-signed certificate with Self-Signed Root CA Signer
The -UseSSL parameter is an additional protection that sends the data across an HTTPS connection instead of an HTTP connection. If I don't use -UseSSL parameter everything is successful as you can see on below screenshot.
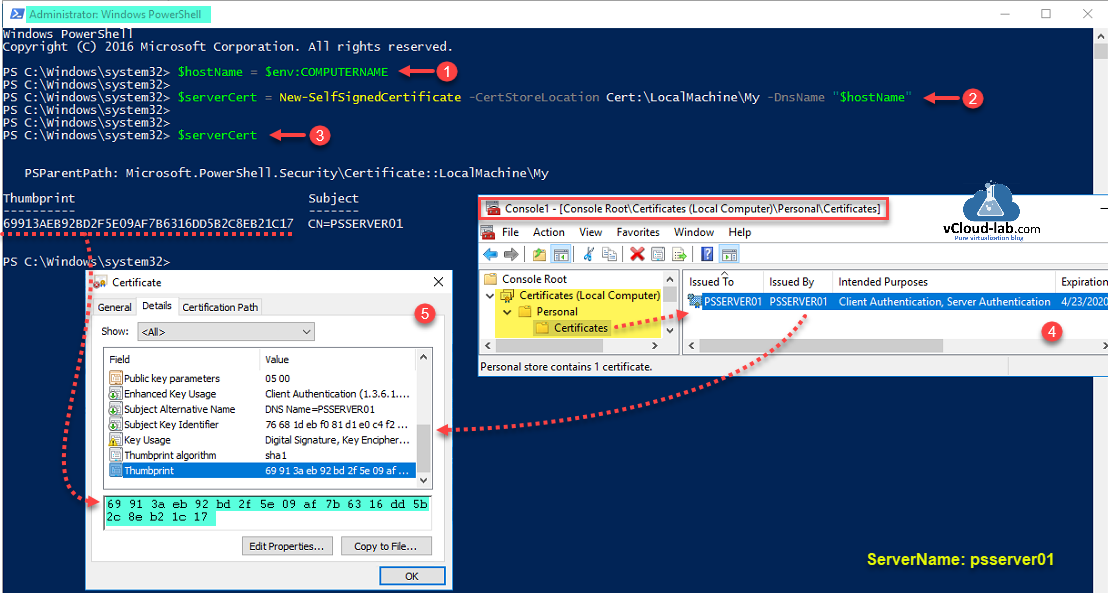
To start configuring SSL certificate, first step is requirement of certificate, which can be self signed or CA certificate. As this is a Lab proof of concept (POC), I am using powershell command to create one cert, Dns name should be matching current hostname as DNSName for self-signed certificate.
$hostName = $env:COMPUTERNAME
$serverCert = New-SelfSignedCertificate -CertStoreLocation Cert:\LocalMachine\My -DnsName $hostName
Verify the thumbprint of the newly created certificate, it is located under Local machine personal certificate store.
$serverCert
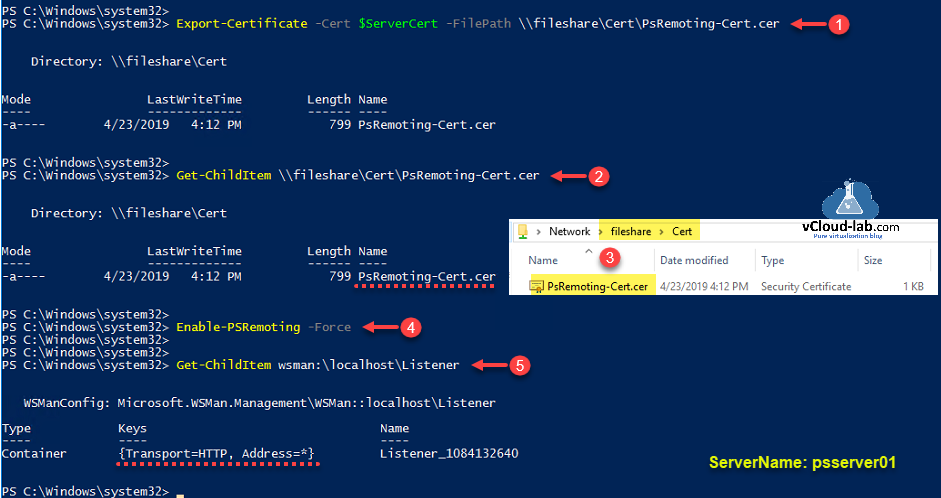
Creation of self signed SSL certificate is successful and it will be needed on the last steps, I am exporting it on remote share drive using below command.
Export-Certificate -Cert $serverCert -FilePath \\fileshare\cert\PsRemoting-Cert.cer
Next verify and check on fileshare for exported certificate that is exported successfully.
Get-ChildItem \\fileshare\Cert\PsRemoting-Cert.cer
You can enable powershell remoting now, Although this command might not be required to run on newer version of windows OS, because remoting is by default enabled.
Enable-PSRemoting -Force
Running above command will update WinRM for remote management, WinRM service type will set and change to delayed auto start and it will be started, and in the last
It creates a WinRM listener on https://* to accept WS-Man requests to any IP for this machine, we will start working on it
Default TCP ports for Powershell Remoting are HTTP - 5985 and HTTPS - 5986. You will always find one default listener (PS-Remoting endpoint) created with name {Transport=HTTPs, Address=*}. Below command helps to view the listener, it is located under PSDrive WsMan.
Get-ChildItem wsman:\localhost\Listener
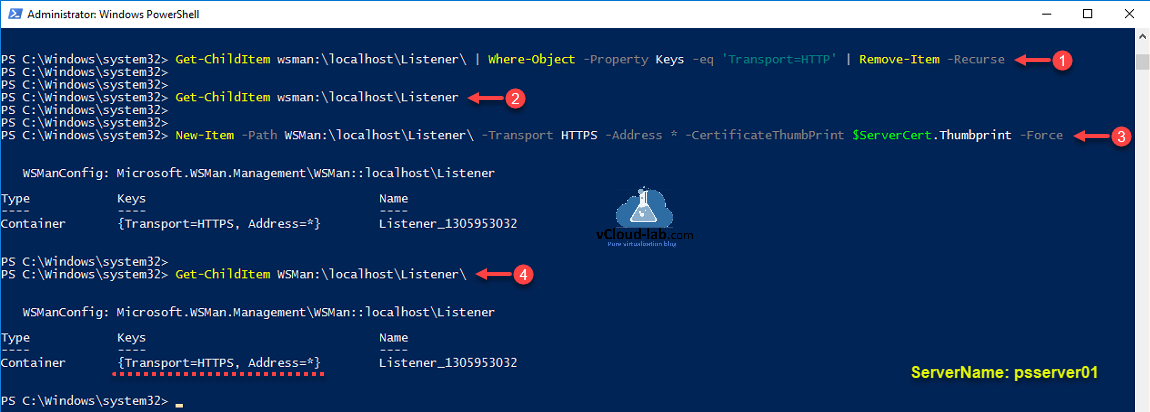
I am going to remove this default HTTP listener. for security reason I will only use HTTPS port to connect. HTTPS can coexist with HTTP.
Get-ChildItem wsman:\localhost\Listener\ | Where-Object -Property Keys -eq 'Transport=HTTP' | Remove-Item -Recurse
Re-verify that no listener is available, running below command again.
Get-ChildItem wsman:\localhost\Listener
Create a new listener with previously created SSL certificate.
New-Item -Path WSMan:\localhost\Listener\ -Transport HTTPS -Address * -CertificateThumbPrint $serverCert.Thumbprint -Force
Rerun the command to verify new setting on the listener, There should be new HTTPS listener created.
Get-ChildItem wsman:\localhost\Listener
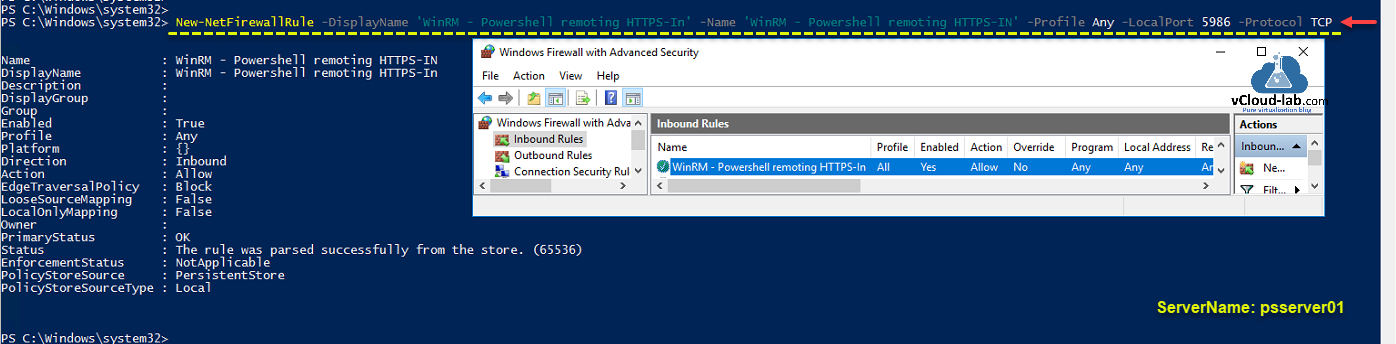
Although I have disabled firewall completely on my lab server, but in case windows software Firewall is enabled in your environment on the server, you will need to create a new rule in firewall to allow traffic through TCP port number 5986. It will be Inbound rule for Windows Remote Management via WS-Management. [TCP 5986].
New-NetFirewallRule -Displayname 'WinRM - Powershell remoting HTTPS-In' -Name 'WinRM - Powershell remoting HTTPS-In' -Profile Any -LocalPort 5986 -Protocol TCP
You can verify the same on Windows Firewall with Advanced Security, Inbound rules settings.
Although restarting WinRM service is not required, but still restart it using command to take effect, you can also use Services.msc - Windows Remote Management (WS-Management).
Restart-Service WinRM

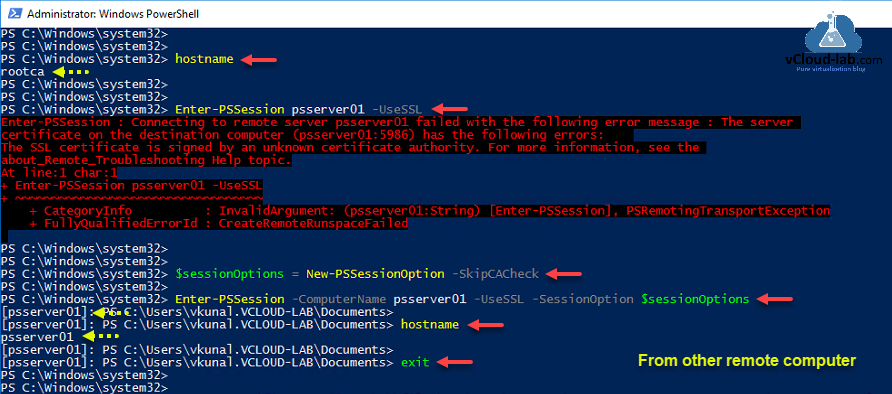
On the other computer from where you want to try remote use command Enter-PSSession <ComputerName> -UseSSL, it might fail again, it will show another error message. As we removed default listener in earlier commands, remoting will not even work without -UseSSL syntax.
Enter-PSSession : Connecting to remote server psserver01 failed with the following error message : The server
certificate on the destination computer (psserver01:5986) has the following errors:
The SSL certificate is signed by an unknown certificate authority. For more information, see the
about_Remote_Troubleshooting Help topic.
At line:1 char:1
+ Enter-PSSession adserver001 -UseSSL
+ ~~~~~~~~~~~~~~~~~~~~~~~~~~~~~~~~~~~
+ CategoryInfo : InvalidArgument: (adserver001:String) [Enter-PSSession], PSRemotingTransportException
+ FullyQualifiedErrorId : CreateRemoteRunspaceFailed
This error is receiving because certificate is self signed and not trusted, for a testing purpose we can skip certificate check to test PSRemoting as below.
$sessionOptions = New-PSSessionOption -SkipCACheck
Enter-PSSession -ComputerName <FQDN_HostName> -UseSSL -SessionOption $sessionOptions
Above command add one line to the script, to avoid it, if you have admin access you can trust the self-signed cert, you will need it to import to Trusted Root Certification Authorities, run command.
Import-Certificate -FilePath \\fileshare\Cert\PsRemoting-Cert.cer -CertStoreLocation Cert:\LocalMachine\root\
Once imported verifiy the certificate thumbprint and try psremoting.
Enter-PSSession -Computername <FQDN> -UseSSL

Useful Articles
Generate new self-signed certificates for ESXi using OpenSSL
Push SSL certificates to client computers using Group Policy
Replacing a default ESXi certificate with a CA-Signed certificate
Troubleshooting replacing a corrupted certificate on Esxi server
How to import default vCenter server appliance VMCA root certificate and refresh CA certificate on ESXi
How to replace default vCenter VMCA certificate with Microsoft CA signed certificate
