Series
POWERSHELL PS REMOTING BETWEEN STANDALONE WORKGROUP COMPUTERS
PowerShell remoting over HTTPS using self-signed SSL certificate
Configure Powershell WinRM to use OpenSSL generated Self-Signed certificate
Powershell WinRM HTTPs CA signed certificate configuration
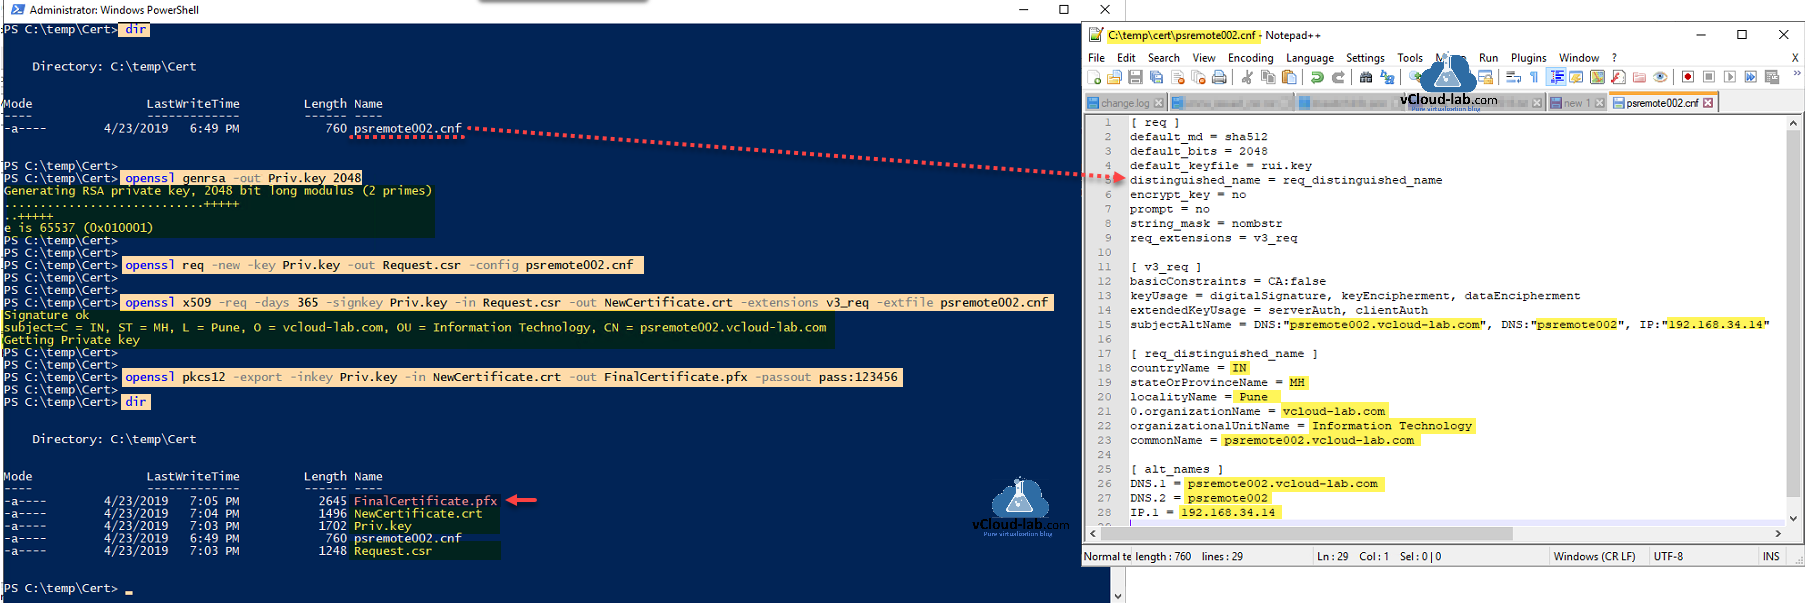
This guide is second part of PowerShell remoting over HTTPS using self-signed SSL certificate, It will not only show how to configure WinRM to use SSL certificate quickly but also will show how you can generate self sign ssl certificate using OpenSSL tool. You can download OpenSSL tool from url https://slproweb.com/products/Win32OpenSSL.html, for further OpenSSL configuration check Generate new self-signed certificates for ESXi using OpenSSL To create new cert, below is the openssl configuration readymade template can be used, you just need to replace bold text as per your requirement. Copy below content in notepad and save it as extension .cnf filename. I am using hostname as file name - psremote002.cnf.
[ req ]
default_md = sha512
default_bits = 2048
default_keyfile = rui.key
distinguished_name = req_distinguished_name
encrypt_key = no
prompt = no
string_mask = nombstr
req_extensions = v3_req
[ v3_req ]
basicConstraints = CA:false
keyUsage = digitalSignature, keyEncipherment, dataEncipherment
extendedKeyUsage = serverAuth, clientAuth
subjectAltName = DNS:"psremote002.vcloud-lab.com", DNS:"psremote002", IP:"192.168.34.14"
[ req_distinguished_name ]
countryName = IN
stateOrProvinceName = MH
localityName = Pune
0.organizationName = vcloud-lab.com
organizationalUnitName = Information Technology
commonName = psremote002.vcloud-lab.com
[ alt_names ]
DNS.1 = psremote002.vcloud-lab.com
DNS.2 = psremote002
IP.1 = 192.168.34.14
First generate a 2048 bit private key. A private key is one half of the public/private key pair used in digital certificates.
openssl genrsa -out Priv.key 2048
Generate a CSR file using private key and configuration file .cnf. A certificate signing request (CSR) is one of the first steps towards getting your own SSL Certificate.
openssl req -new -key Priv.key -out Request.csr -config psremote002.cnf
Use private key file, csr file and cnf file to generate new actual SSL certificate it will have crt extension, Certificate version will be 3 and it will be valid for 1 year.
openssl x509 -req -days 365 -signkey Priv.key -in Request.csr -out NewCertificate.crt -extensions v3_req -extfile psremote002.cnf
Certificate is generated but we need pfx file which will include private key and ssl certificate crt file, you need to specify password also. Remember this password for later use. PFX - stands for personal exchange format.
openssl pkcs12 -export -inkey Priv.key -in NewCertificate.crt -out FinalCertificate.pfx -passout pass:123456
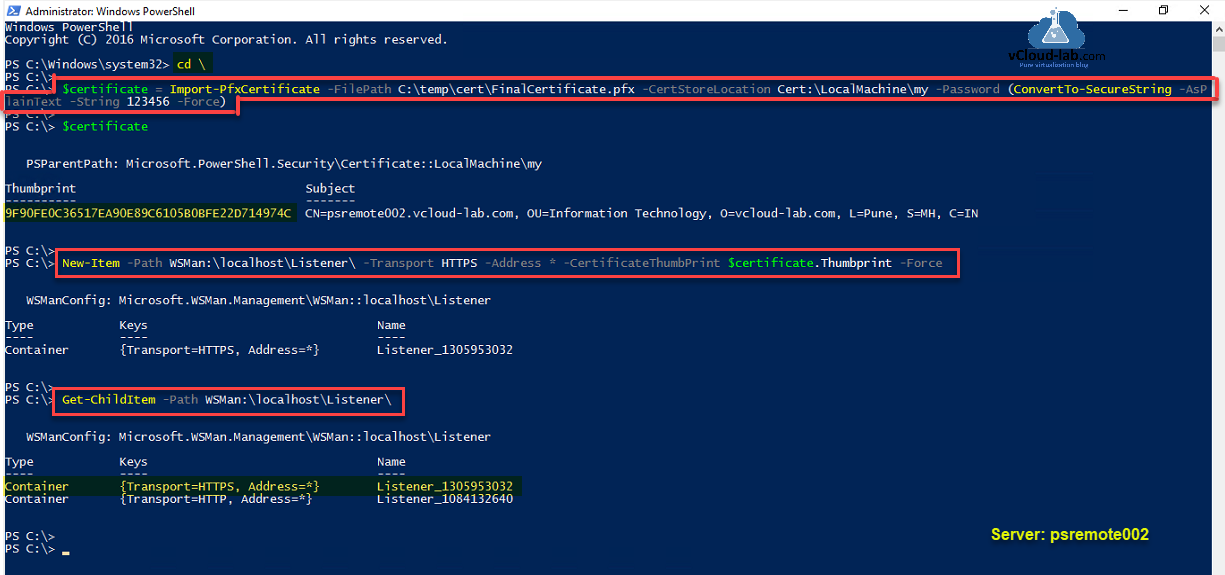
Import the pfx certificate to computers personal certificate store, where you are activating HTTPS powershell remoting. Use the same password used while generating PFX file.
$certificate = Import-PfxCertificate -FilePath C:\temp\cert\FinalCertificate.pfx -CertStoreLocation Cert:\LocalMachine\my -Password (ConvertTo-SecureString -AsPlainText -String 123456 -Force)
Verify thumbprint of imported certificate.
$certificate
Next configure WinRM Powershell Remoting protocol, by creating a new HTTPS listener with imported pfx certificate. It is suggested to delete HTTP Listener completely and use only SSL HTTPS connection.
New-Item -Path WSMan:\localhost\Listener -Transport HTTPS- Address * -CertificateThumbPrint $certificate.Thumbprint -Force
There should be two listeners now HTTP and HTTPS, Verfiy them using command below.
Get-ChildItem WSMan:\localhost\Listener
I am importing pfx certificate on another computer to trust it, I am using share path to access pfx cert, It need to be imported to Trusted Root Certification Authorities location on certificate store. Always verify thumbprint for integrity of ssl certificate.
Import-PfxCertificate -FilePath \\192.168.34.14\c$\temp\cert\FinalCertificate.pfx -CertStoreLocaion Cert:\LocalMachine\Root -Password (ConverTo-SecureString -AsPlainText -String 123456 -Force)

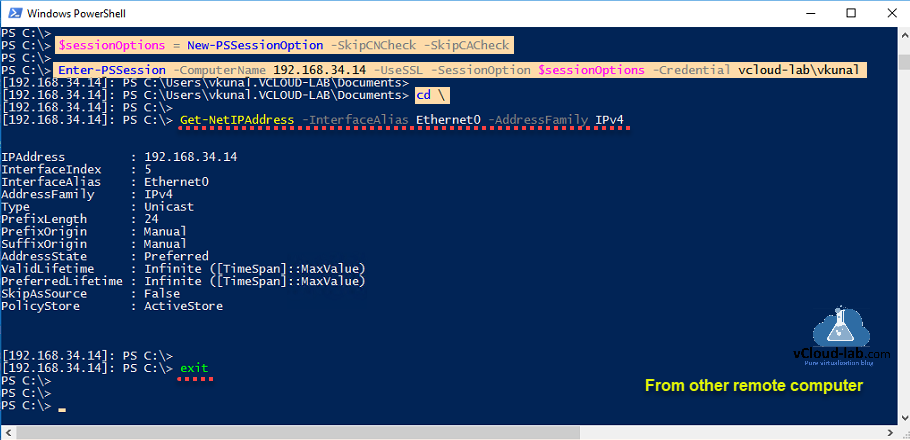
Incase if you want to use IP address instead of fqdn or hostname to connect over PSRemoting, Use PSSessionOption with SkipCNCheck, Use SkipCACheck if you don't want to import certificate.
$sessionOptions = New-PSSessionOption -SkipCNCheck
Enter-PSSession -ComputerName 192.168.34.14 -UseSSL -SessionOption $sessionOptions -Credential vCloud-lab.com\kunal
Run some command ie hostname or ipconfig (Get-NetIPAddress) to verify you have connected successfully from remote computer.
Useful Articles
Generate new self-signed certificates for ESXi using OpenSSL
Push SSL certificates to client computers using Group Policy
Replacing a default ESXi certificate with a CA-Signed certificate
Troubleshooting replacing a corrupted certificate on Esxi server
How to import default vCenter server appliance VMCA root certificate and refresh CA certificate on ESXi
How to replace default vCenter VMCA certificate with Microsoft CA signed certificate
