Useful Links
Microsoft Windows 2016 Install and configure NFS server for ESXi and Linux
VMWare ESXi add and create NFS datastore
Mount NFS share to multiple ESXi hosts
Unmount NFS datastores from VMware ESXi and NFS is in use
Add NFS datastores to VMware ESXi hosts using PowerCLI
Here I will use Powershell cmdlets to install and configure NFS server on windows server. Same task I have implemented previously using graphical user interface - Server Manager as shown in above links. Here on the windows server 2016 open Powershell as an Administrator. To list the required NFS server role, Use below cmdlet, Make the note of install state its available.
Get-WindowsFeature *nfs*
Next command installs NFS server with including all required sub features and management tools. Use Name from previous result.
Install-WindowsFeature FS-NFS-Service -IncludeAllSubFeature -IncludeManagementTools
This installation doesn't require restart, exit code is success and success is true. Next create NFS share, I have already created folder on c:\nfs01.
New-NfsShare -Name 'nfs01' -Path 'C:\nfs01' -EnableUnmappedAccess $True -Authentication sys
Warning: Windows NFS server is not listed on VMWare HCL as Esxi NFS datastore. I am using it as a demo purpose.
Once NFS share is created, It needs to assign share permissions, here I am adding Esxi servers with read/write and root access. Name should be nfs share name from previous result. I am adding one by one changing ClientName.
Grant-NfsSharePermission -Name 'nfs01' -ClientName 'Esxi001.vcloud-lab.com' -ClientType 'Host' -Permission 'readwrite' -AllowRootAccess:$true
Grant-NfsSharePermission -Name 'nfs01' -ClientName 'Esxi002.vcloud-lab.com' -ClientType 'Host' -Permission 'readwrite' -AllowRootAccess:$true
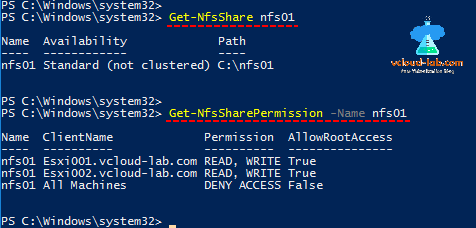
Here NFS server is installed and configured successfully, Created NFS Share and allocated permissions using Powershell, If you want to check the existing shares and configured permissions, use below cmdlets.
Get-NfsShare
Get-NfsSharePermission


