vCenter Server is the unified management service for VMware, and is used to handle virtual machines, multiple ESXi hosts, and all dependent elements from a single centralized location. As a base I have already deployed my ESXi server in the lab with VMware ESXi 8.0 step by step Installation guide with Screenshots. I will deploy vCenter server (VCSA) will be deployed on the same ESXi server. Incase if you are trying to install VCSA on VMware Workstation you can use article How to deploy vCenter server appliance on VMware Workstation.
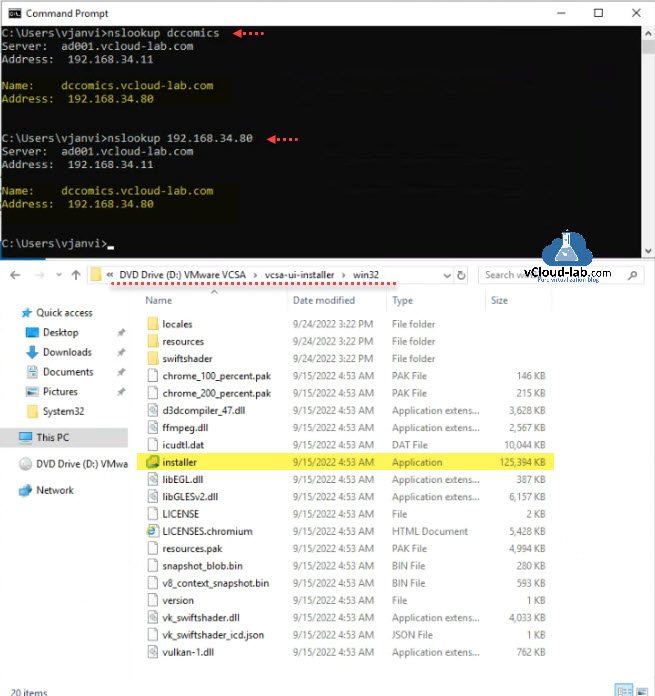
Before proceeding for installation of VCSA 8.0, make sure nslookup is working for vCenter hostname and IP Address. To add DNS entry on the server you can use article Powershell Add multiple bulk DNS records from csv file. Alternatively you can add entries inside c:\windows\system32\drivers\etc\hosts file.
I have downloaded VCSA 8.0 ISO from https://customerconnect.vmware.com/ website and mounted it on the windows system. Execute Installer.exe application from CD\DVD Drive <VMware VCSA>:\vcsa-ui-installer\win32 ISO folder location,
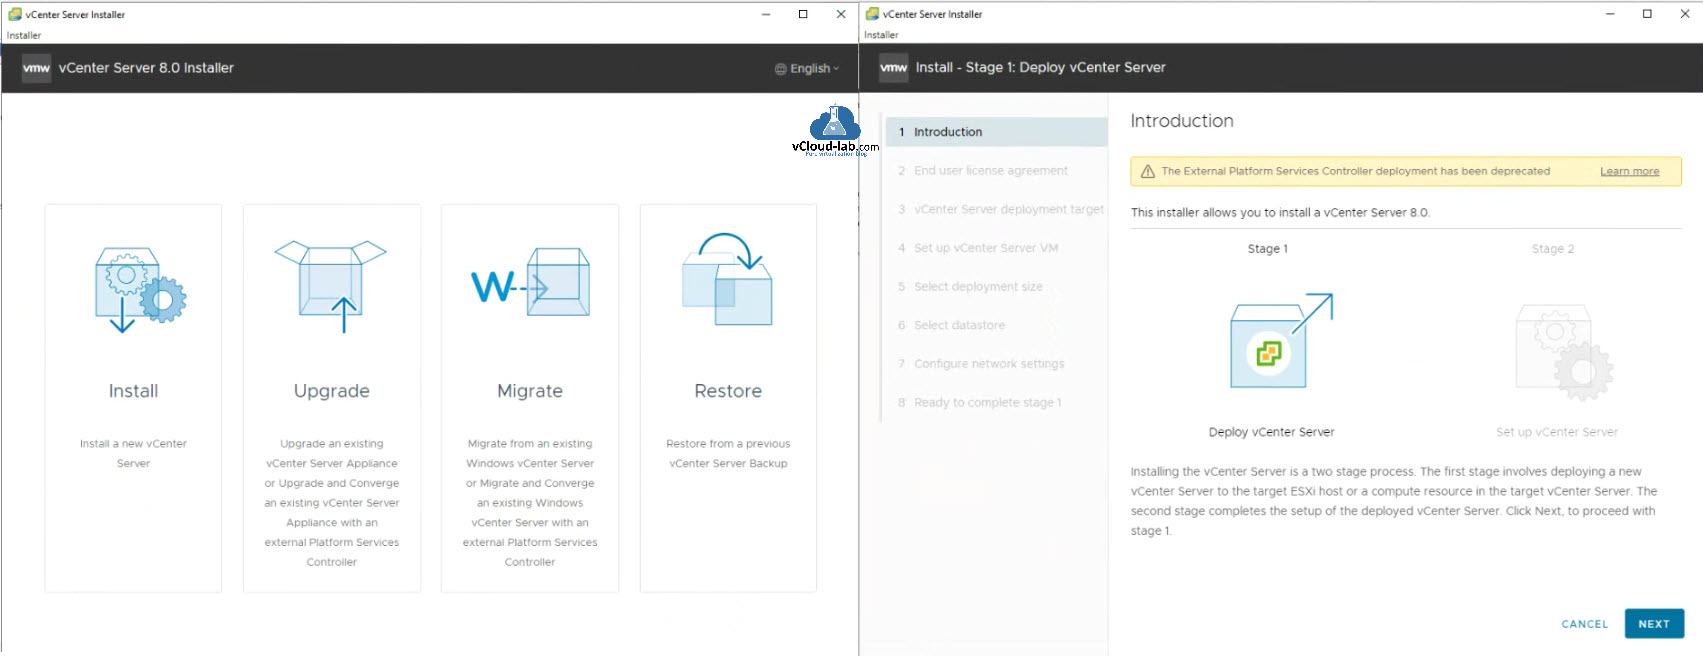
In the vCenter Server 8.0 installer there are 4 types of VCSA deployment you can do. I am choosing fresh Install in this article.
Install: Install a new vCenter Server
Upgrade: Upgrade an existing vCenter Server Application or Upgrade and converge an external Platform Services Controller.
Migrate: Migrate from an existing windows vCenter Server or Migrate and Converge an existing Windows vCenter server with an external Platform Services Controller.
Restore: Restore from a previous vCenter Server Backup
Note: The External Platform Services Controller deployment has been deprecated.
Installing the vCenter server is a two stage process. The first stage involves deploying a new vCenter server to the target ESXi host server or a compute resource in the target vCenter Server. Click Next to proceed with stage 1.
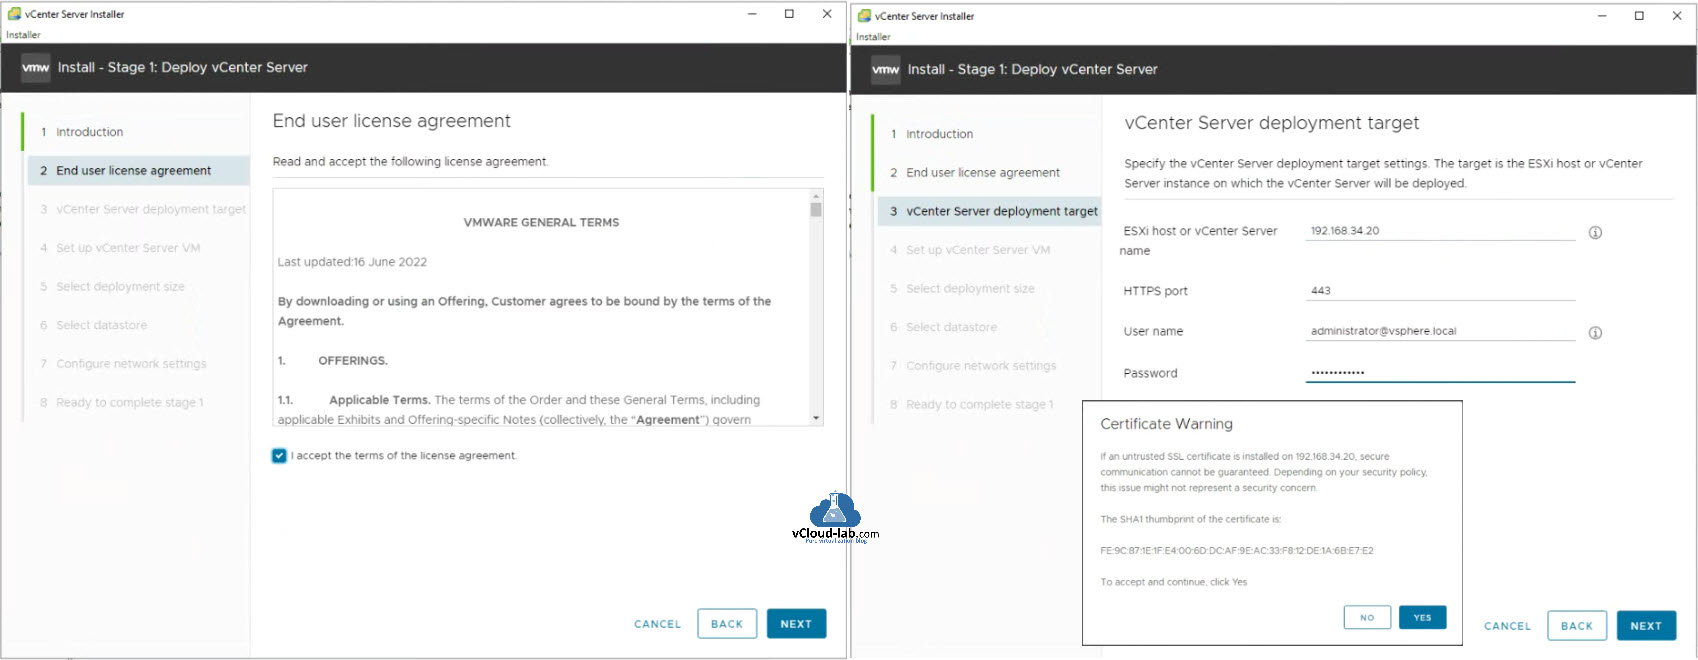
Click select CheckBox for I accept the terms of the license agreement. In the vCenter Server deployment target, specify the vCenter Server deployment target settings. The target is the ESXi host or vCenter Server instance on which the vCenter Server will be deployed. Press Next to authenticate to ESXi/vCenter server. There might be Certificate warning, click Yes.
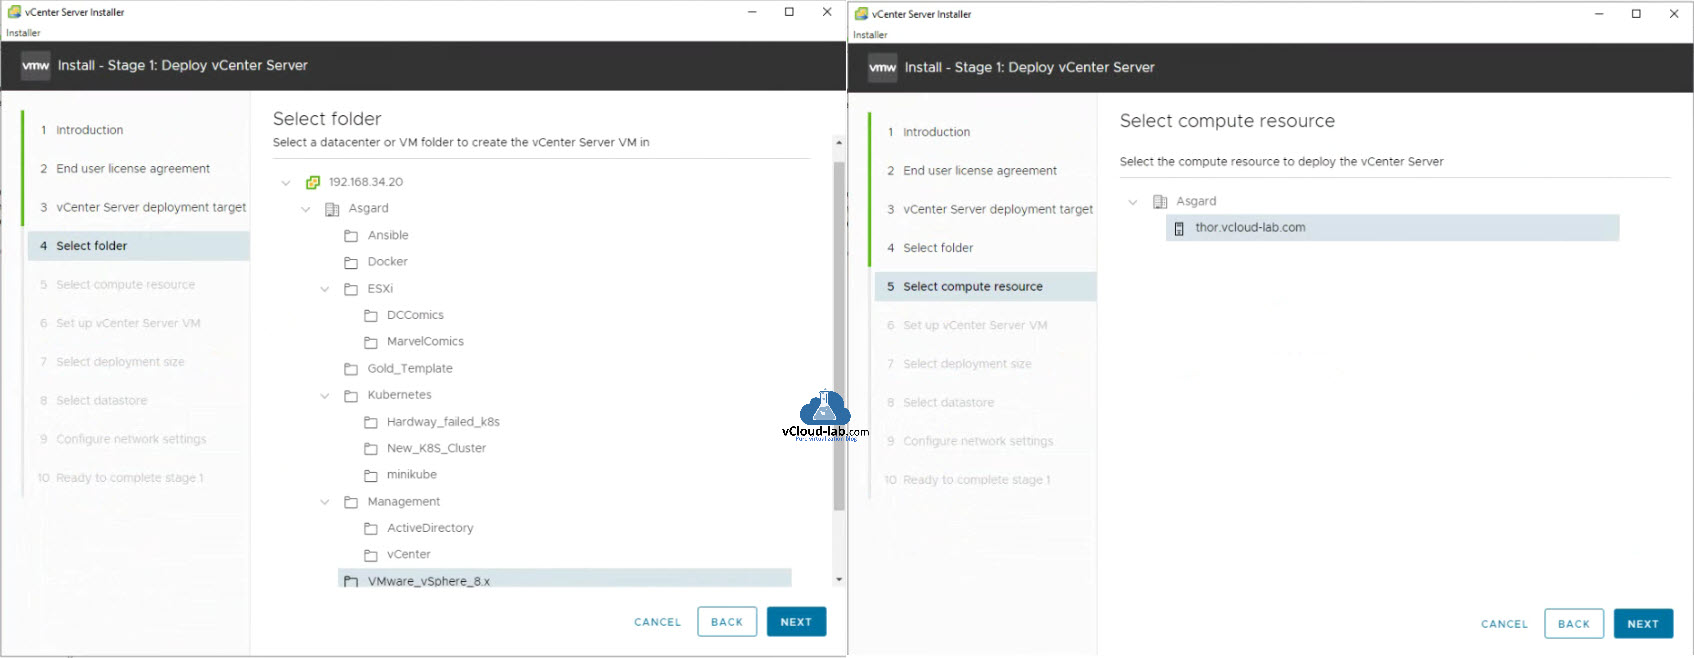
In the Select folder, Select a datacenter or VM folder to create the vCenter Server VM. Click Next to proceed to Select compute resource (Esxi server where vCenter server appliance will be deployed).
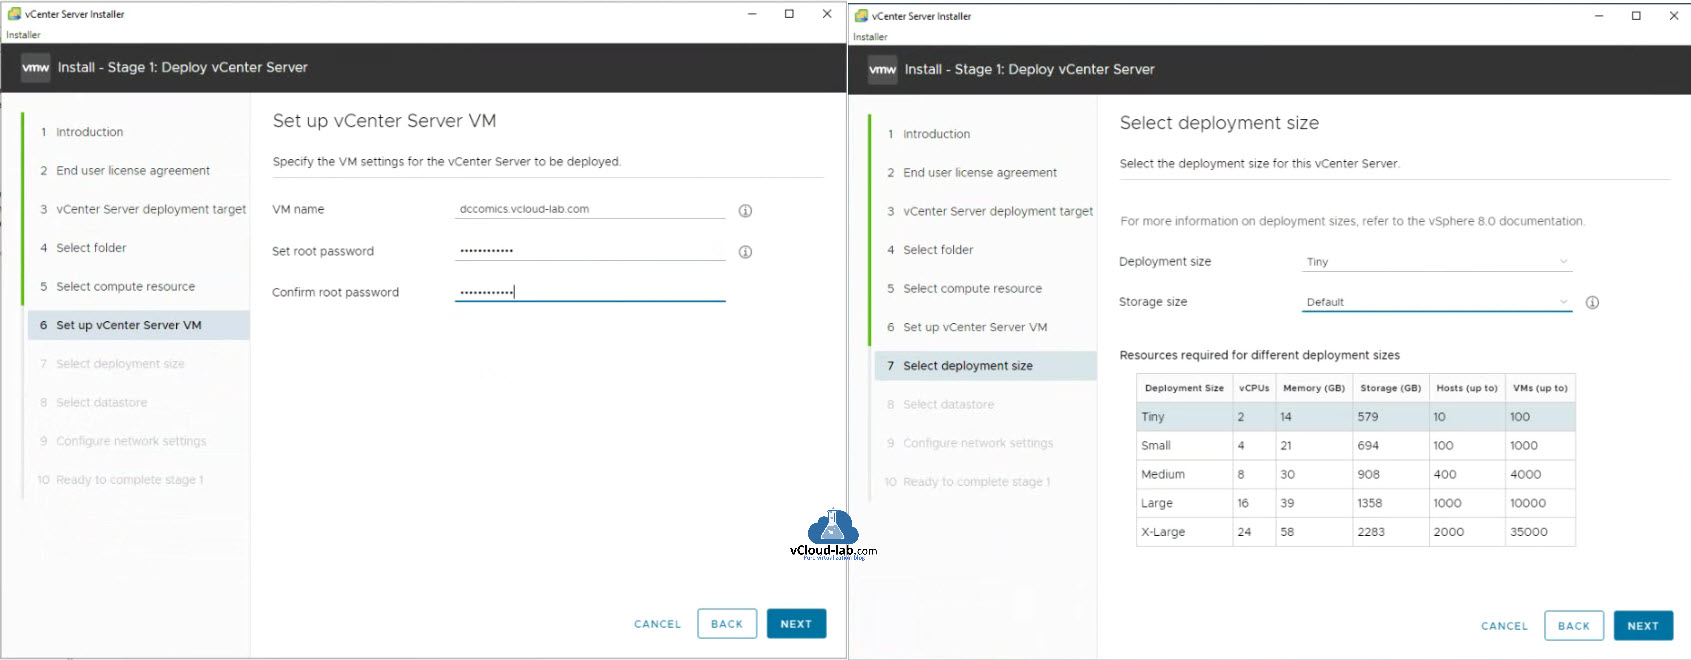
Specify the VM settings for the vCenter Server to be deployed in Set up vCenter Server VM. Select deployment size for this vCenter Server, for more on deployment sizes, refer to the vSphere 8.0 documentation. I am selecting Tiny Deployment size and Default Storage size. Click Next.
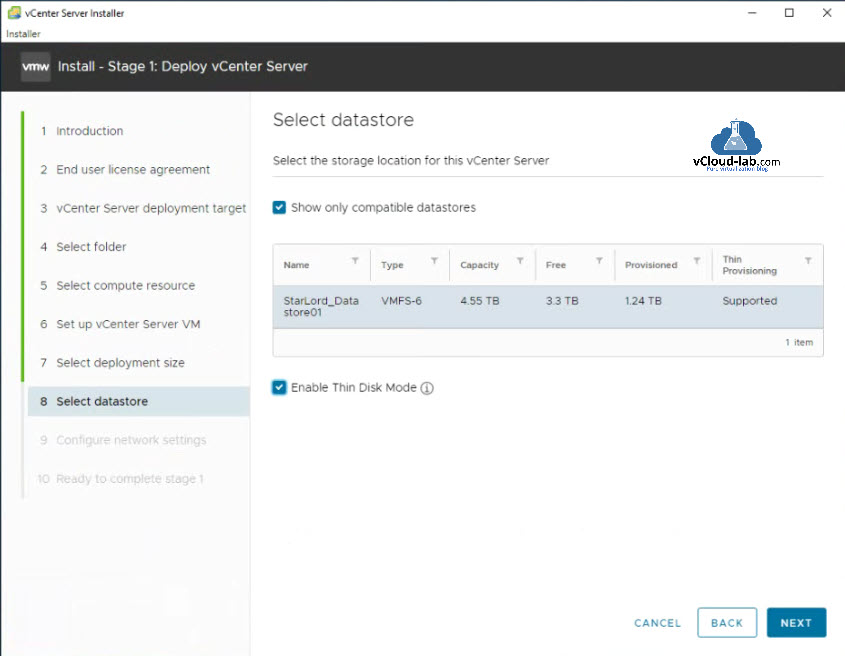
Select the storage location for this vCenter Server in Select datastore. It shows only compatible datastores if checkbox is selected. I am enabling Thin Disk mode (Thin provisioning allots disk space to consumers on demand based on how much disk space they need at any given time. As a user saves more data, they take up more of the disk; when they delete data, their section decreases. Departments on physical storage are virtual and elastic rather than defined in advance). Click Next.
This is final and important step of deployment of VCSA. In the Configure network settings I am providing static information for IP address. Select Network (Virtual PortGroup) on vCenter or ESXi server, Provide IP version - IPv4, IP assignment - static, FQDN, IP address, Subnet mask or prefix length, Default gateway, DNS servers.
Keep common ports http - 80 and https - 443 to default. Press Next. On the Ready to complete stage 1 wizard page, Review your settings before starting the vCenter Server deployment. Click Finish button.

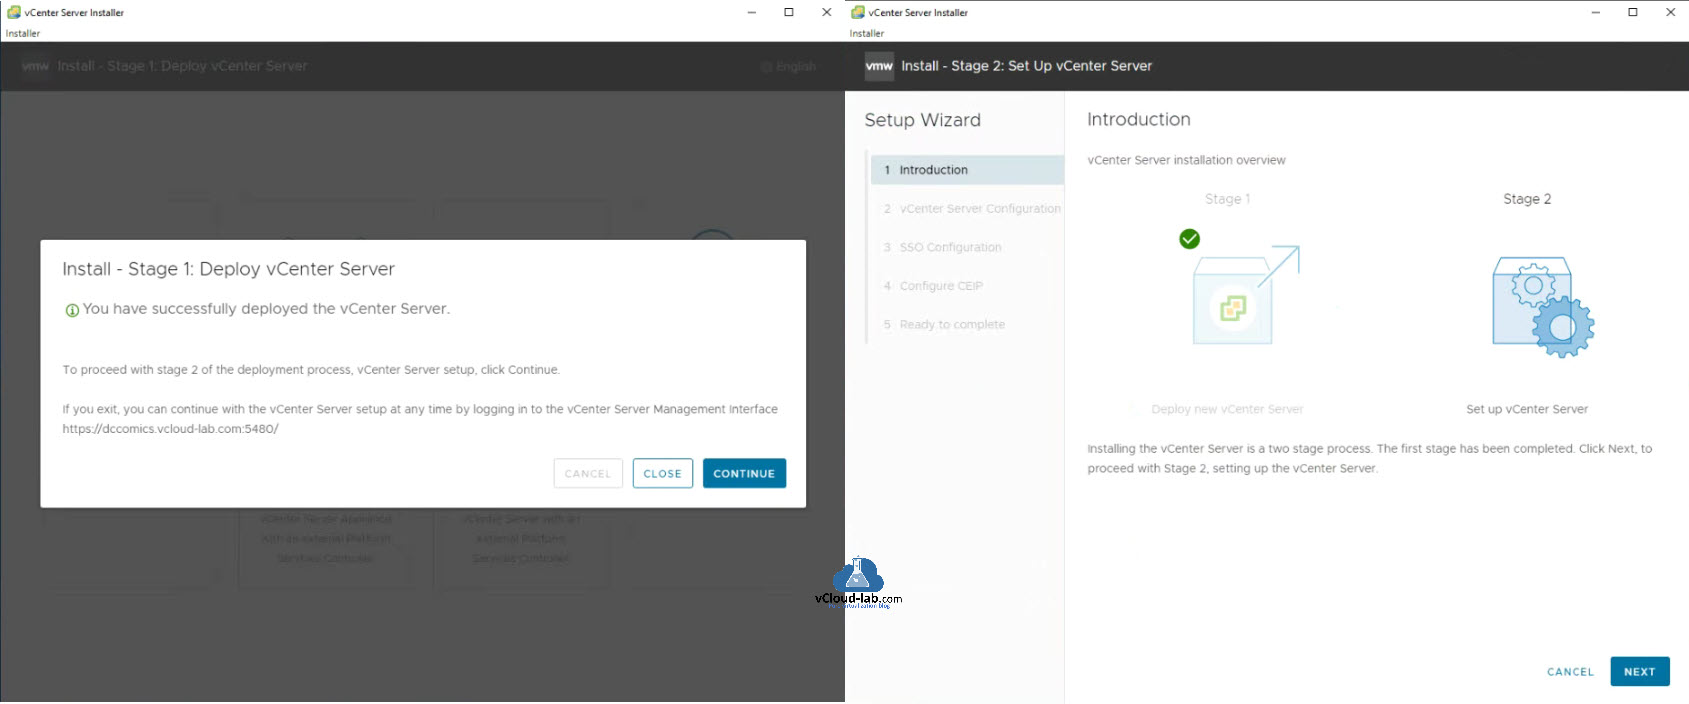
This takes some time to deploy vCenter server appliance. Once stage 1 is completed successfully, To proceed with stage 2 of the deployment process, on vCenter server setup click Continue.
In case if you exit the setup installer window, you can continue with the vCenter Server setup at any time by logging in to the vCenter Server Management Interface (VAMI) https://vCenter_FQDN_or_IP:5480/
After pressing continue button Install - Stage 2: of Set up vCenter Server starts. Installing the vCenter Server is a two stage process. The first stage has been completed. Click Next. to proceed with Stage 2: setting up the vCenter Server.
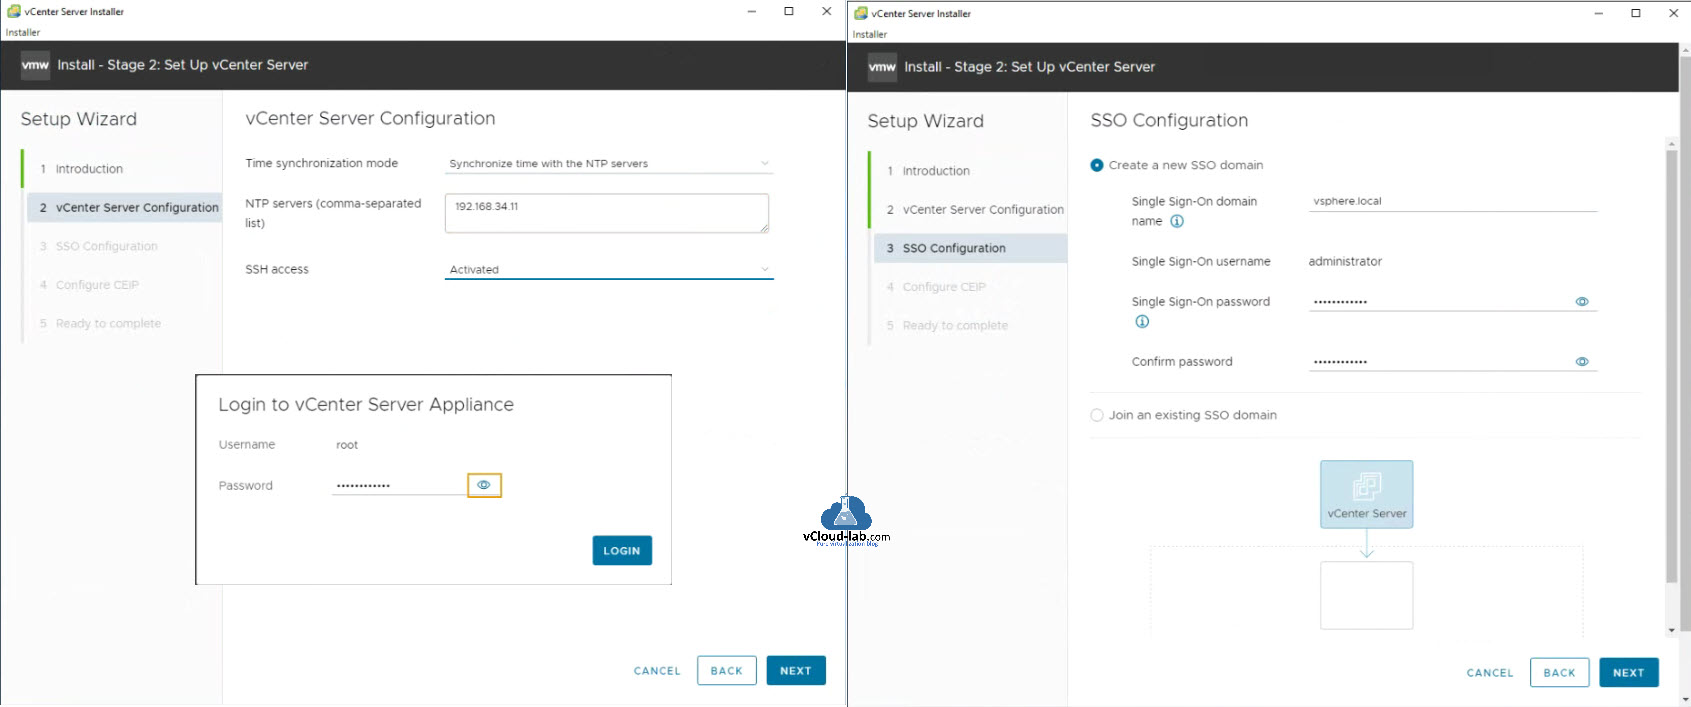
In next, Setup Wizard, In the vCenter Server Configuration check Time synchronization mode as Synchronize time with the NTP servers. For multiple NTP servers they should be comma-separated list. Activate enable SSH access.
Once you press Next button. It will ask to Login to newly deployed vCenter Server Appliance with root Username and Password. Click Login. Once it is logged into new VCSA, next stop is SSO configuration (VMware vCenter Single Sign-On (SSO) is an authentication broker and security token exchange infrastructure, which permits vSphere elements to connect with each other over a safe token mechanism and utilizes the subsequent services. Security Token Service (STS) SSL for secure traffic).
Create a new SSO domain, provide Single Sign-On domain name (default is vsphere.local) and password. Click Next.
Note: Default SSO username is administrator.
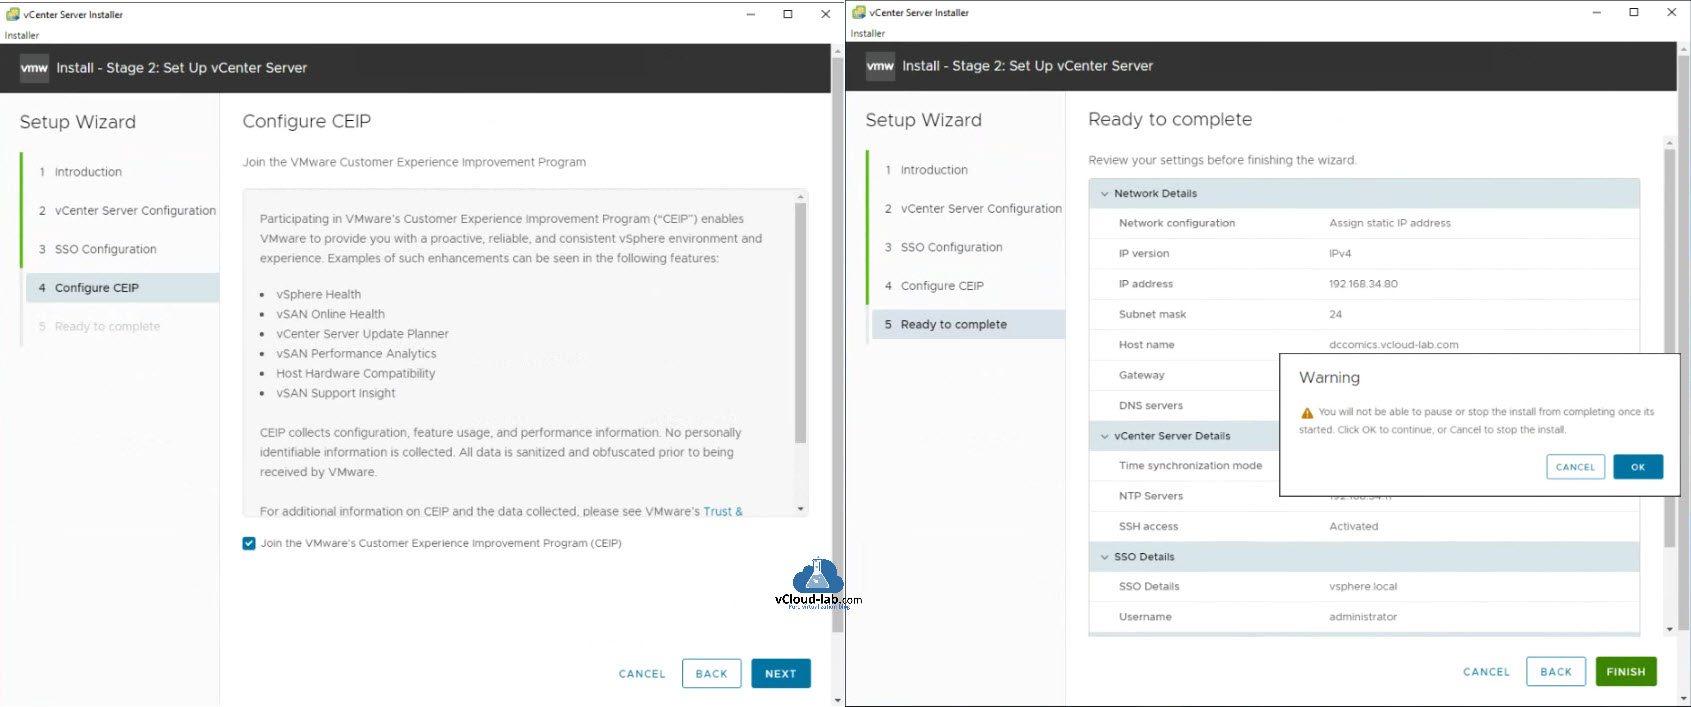
In the Configure CEIP, Join the VMware Customer Experience improvement Program (CEIP). Participating in the VMware's Customer Experience Improvement Program ("CEIP") enables VMware to provide you with a proactive, reliable, and consistent vSphere environment and experience. Examples of such enhancement can be seen in the following features:
- vSphere Health
- vSAN Online Health
- vCenter Server Update Planner
- vSAN Performance Analytics
- Host Hardware Compatibility
- vSAN Support insight
CEIP collects configuration, feature usage and performance information. No personally identifiable information is collected. All data is sanitised and obfuscated prior to being received by VMware. Click Next.
In the Ready to complete page, Review your settings before finishing the wizard. You will see warning once you verify and press Finish button that You will not be able to pause or stop the install from completing once its started. Click Ok to continue or cancel to stop the install. Press OK button.
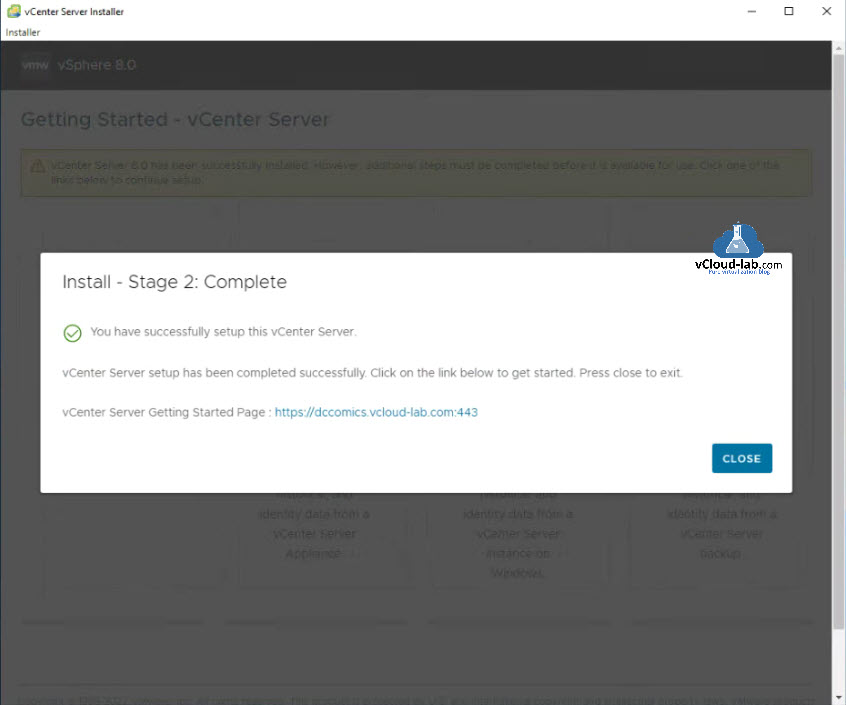
It takes some time to Install - Stage 2: complete. Once vCenter Server setup has been completed successfully, Click on the link below to get start. Press close to exit.
vCenter Server Getting Started page is https://vCenter_Server_Or_IP:443/.
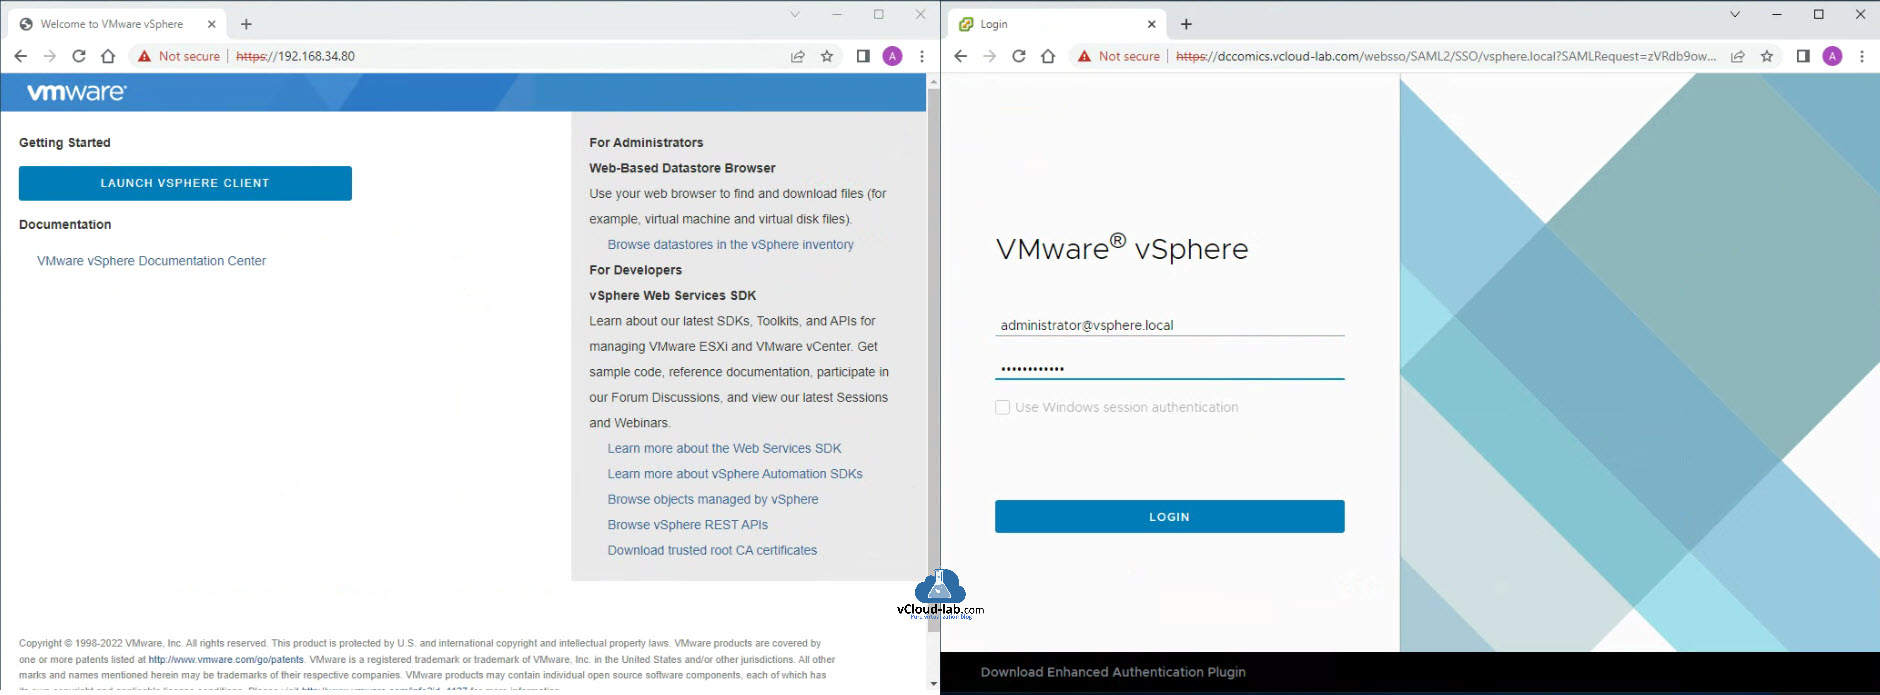
This is Getting started page of VMware vSphere vCenter client welcome page. Click on Launch vSphere Client and provide username (administrator@vsphere.local) and password then click Login button.
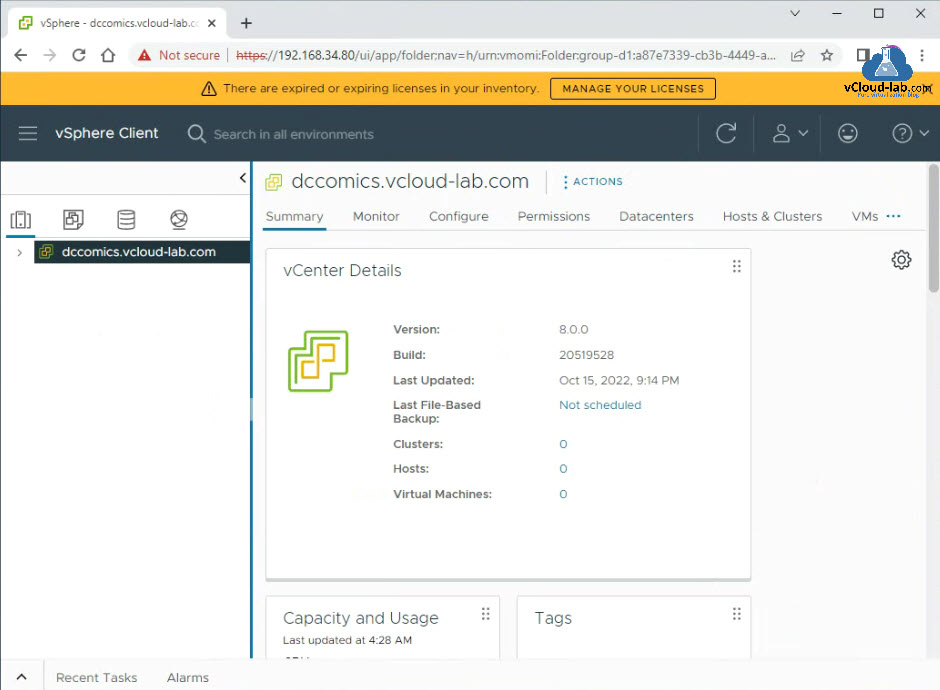
I am successfully logged into vCenter server using web browser based vSphere Client. I don't have licenses but this setup will work in Evaluation mode for next 60 days.
Useful Articles
PART 1 : BUILDING AND BUYING GUIDE IDEAS FOR VMWARE LAB
PART 2 : BUILDING AND HARDWARE BUYING GUIDE IDEAS FOR VMWARE LAB
PART 3 : MY VSPHERE LAB CONFIGURATION ON VMWARE WORKSTATION
PART 4 : CONFIGURING VMWARE WORKSTATION NETWORKING IN HOME LAB
PART 5 : CONFIGURING STORAGE IN VMWare WORKSTATION FOR OPTIMAL SPEED
PART 6 : CONFIGURE VMWARE WORKSTATION TO SAVE SSD SPACE AND TIME
PART 7 : CREATING NESTED VMWARE ESXI SERVER VM IN HOMELAB ON VMWARE WORKSTATION
PART 8 : CPU COOLING SOLUTION FOR MY HOME LAB ON VMWARE WORKSTATION
Part 9: Guide to building a Home Lab
Part 1: VMware Powercli : Gather distributed virtual switch information to JSON file to migrate standard switch
Part 2: Copy or clone distributed virtual switch portgroups to standard switch portgroups - Powercli
Part 3: VMware Powercli: Migrate VMs to another network
