Today I was building some script for PowerShell DSC (Desired State Configuration), Scenario was to run PowerShell DSC script and push configuration against standalone computers which are in workgroup, they were not joined in the Domain or sitting in the DMZ and not required to join to domain due to security reason, For this WINRM protocol configuration is required in non domain environment. I am trying to simulate the same scenario in my lab environment on how to configure it step by step. I have one server with IP 192.168.33.41 and Desktops are 192.168.33.1 and 192.168.34.1.
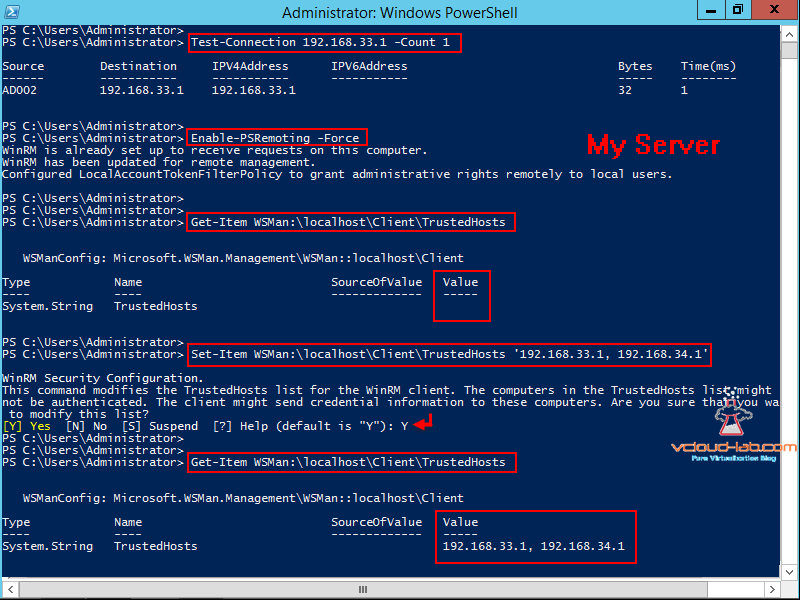
I opened Powershell as an administrator on the Windows 2012 R2 server 192.168.33.41, first check whether there is a connectivity between server and one of the desktop using Test-Connection command also equivalent to ping. Make sure firewall open for winrm ports http - 5985, https - 5986. (if winrm service is not configured it will listen on port 47001). Next start winrm services and configure using below command.
Enable-PSRemoting -Force
-force parameter is to suppress confirmation question. Additionally you can use winrm quickconfig command ad substitute.
Useful Blog related to DSC
POWERSHELL PS REMOTING BETWEEN STANDALONE WORKGROUP COMPUTERS
DSC (DESIRED STATE CONFIGURATION) : DEPLOYING ACTIVE DIRECTORY
PART 1 : POWERSHELL - CREATE LOCAL IIS WEB REPOSITORY FOR DSC MODULE
POWERSHELL: USE PARAMETERS AND CONFIGURATION FROM INI FILE, USE AS SPLATTING
POWERSHELL CREATE HASHTABLE FROM MICROSOFT EXCEL
As by default WinRM service is already set up to receive requests on the the Windows 2012 R2, it will update WinRM for Remote Management. And third setting it will configure is LocalAccountTokenFilterPolicy to grant administrative rights remotely to local users so local users can be used for login remotely.
PSRemoting is started and running now, Now we need to configure who can remote in remotely. for this we need to add servers in TrustedHosts list, in my case I am adding my desktops IPs. Below command just show what the hosts can connect remotely. As it is not configured, Value column is blank and no other Server or desktop can remote in to this server.
Get-Item WSMan:\localhost\Client\TrustedHosts
After adding my desktop IPs with below command, I can recheck TrustedHosts list again using same above command.
Set-Item WSMan:\localhost\Client\TrustedHosts '192.168.33.1, 192.168.34.1'
More servers can be modified by using comma. At this point my server is ready its time to configure Desktops with same commands.
In case if you don't configure PSRemoting on your desktop you will get below error while remoting.
Enter-PSSession : Connecting to remote server 192.168.33.41 failed with the following error message : The WinRM client cannot process the request. If the authentication scheme is different from Kerberos, or if the client computer is not joined to a domain, then HTTPS transport must be used or the destination machine must be added to the TrustedHosts configuration setting. Use winrm.cmd to configure TrustedHosts. Note that computers in the TrustedHosts list might not be authenticated. You can get more information about that by running the following command: winrm help config. For more information, see the about_Remote_Troubleshooting Help topic.
At line:1 char:1
+ Enter-PSSession -ComputerName 192.168.33.41 -Credential administrator
+ ~~~~~~~~~~~~~~~~~~~~~~~~~~~~~~~~~~~~~~~~~~~~~~~~~~~~~~~~~~~~~~~~~~~~~
+ CategoryInfo : InvalidArgument: (192.168.33.41:String) [Enter-PSSession], PSRemotingTransportException + FullyQualifiedErrorId : CreateRemoteRunspaceFailed

My dekstop required to connect many server for this reason i will be adding all server, in Trusted hosts I provided Wild Card *. This way I don't have to worry each time adding new server to the list.
Enable-PSRemoting #I forgot to provide -force command and I had to confirm yes on each prompt and press enter for further configuration.
Get-Item WSMan:\localhost\Client\TrustedHosts #Checking trustedhosts current value

Set-Item WSMan:\localhost\Client\TrustedHosts '*' # Add WildCard '*' and confirm yes
Get-Item WSMan:\localhost\Client\TrustedHosts #Checking trustedhosts value 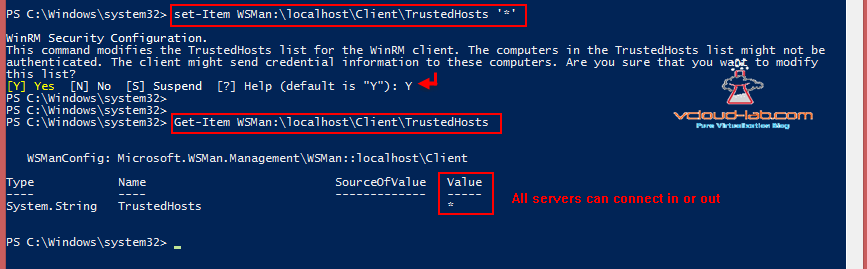
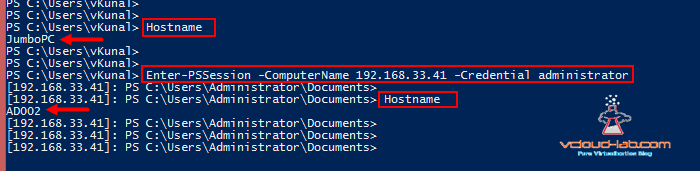
I ran hostname command to show the desktop computer name, Next command to check and verify I can create session or connect to the server using Enter-PSSession (It is as simular as RDP remote desktop connection but using WinRM protocol to connect in the command line).
Enter-PSSession -ComputerName 192.168.33.41 -Credential administrator
Once the command is fired up it will ask for password, You can get to know by changed prompt that you are connected successfully. I can once again run hostname to verify I am connected successfully.
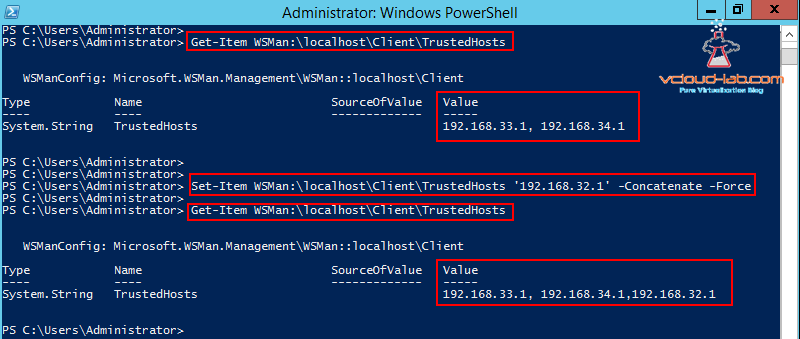
There is trick in the last if you want to add more desktop or jumpservers on your servers Trustedhost list retaining the current one use below oneliner.
Set-Item WSMan:\localhost\Client\TrustedHosts '192.168.32.1' -Concatenate -Force