Part 1: Basic Powershell WPF Themes guide step by step
Part 2: Powershell WPF Themes guide step by step
Part 3: Powershell wpf MahApps.Metro theme step by step
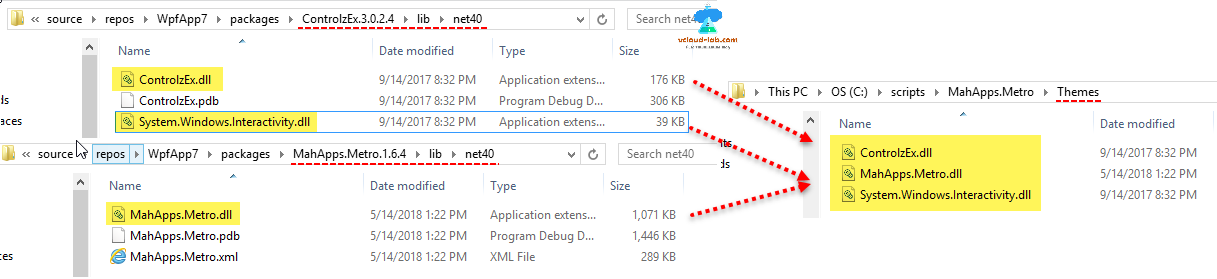
As shown in my previous articles using sample xaml as style and themes, here I am using community popular MahApps.Metro wpf theme, This is a royal theme and looks very very cool. Implementation is bit different from the previous step by step guides, but idea is same. To download this theme package, On the Visual studio go to Tools, then NuGet Package Manager and select Package Manager Console. On the command line type Install-Package MahApps.Metro hit enter. It starts downloading two main packages ControlzEx and MahApp.Metro to the underlined folder. These folder contains different version .net dll libraries program files.

I have collected and copied 3 dll files from .net40 folders under lib folders from respective packages. All three dll files are pasted under themes.
- ControlzEx.dll
- System.Windows.Interactivity.dll
- MahApps.Metro.dll
Go through my earlier post for step by step detail on writing complete GUI script - Part 1: Create WPF XAML powershell GUI form with Visual studio, I have created one fresh xaml form and made changes as below.
#1
My Ps1 file with code is kept under MahApps.Metro folder. and Content is as below. This code loads all the .dll assembly libraries from themes folder.
$ScriptPath = Split-Path -Parent $MyInvocation.MyCommand.Path
$AssemblyLocation = Join-Path -Path $ScriptPath -ChildPath .\themes
foreach ($Assembly in (Dir $AssemblyLocation -Filter *.dll)) {
[System.Reflection.Assembly]::LoadFrom($Assembly.fullName) | out-null
}
#2
Change starting node syntax from <Window to <Controls:MetroWindow.
#3
Next add new namespace xmlns:Controls="clr-namespace:MahApps.Metro.Controls;assembly=MahApps.Metro".
#4
Below are the dll libraries xaml theme style files, they are embedded in the dll applications. Paste it as it is above <Grid> and below Title. You can change the Color and base color, I have provided supported color names which you can change anytime.
<Window.Resources>
<ResourceDictionary>
<ResourceDictionary.MergedDictionaries>
<!-- MahApps.Metro resource dictionaries. Make sure that all file names are Case Sensitive! -->
<ResourceDictionary Source="pack://application:,,,/MahApps.Metro;component/Styles/Controls.xaml" />
<ResourceDictionary Source="pack://application:,,,/MahApps.Metro;component/Styles/Fonts.xaml" />
<ResourceDictionary Source="pack://application:,,,/MahApps.Metro;component/Styles/Colors.xaml" />
<!-- Accent and AppTheme setting -->
<!--“Red”, “Green”, “Blue”, “Purple”, “Orange”, “Lime”, “Emerald”, “Teal”, “Cyan”, “Cobalt”, “Indigo”, “Violet”, “Pink”, “Magenta”, “Crimson”, “Amber”, “Yellow”, “Brown”, “Olive”, “Steel”, “Mauve”, “Taupe”, “Sienna” -->
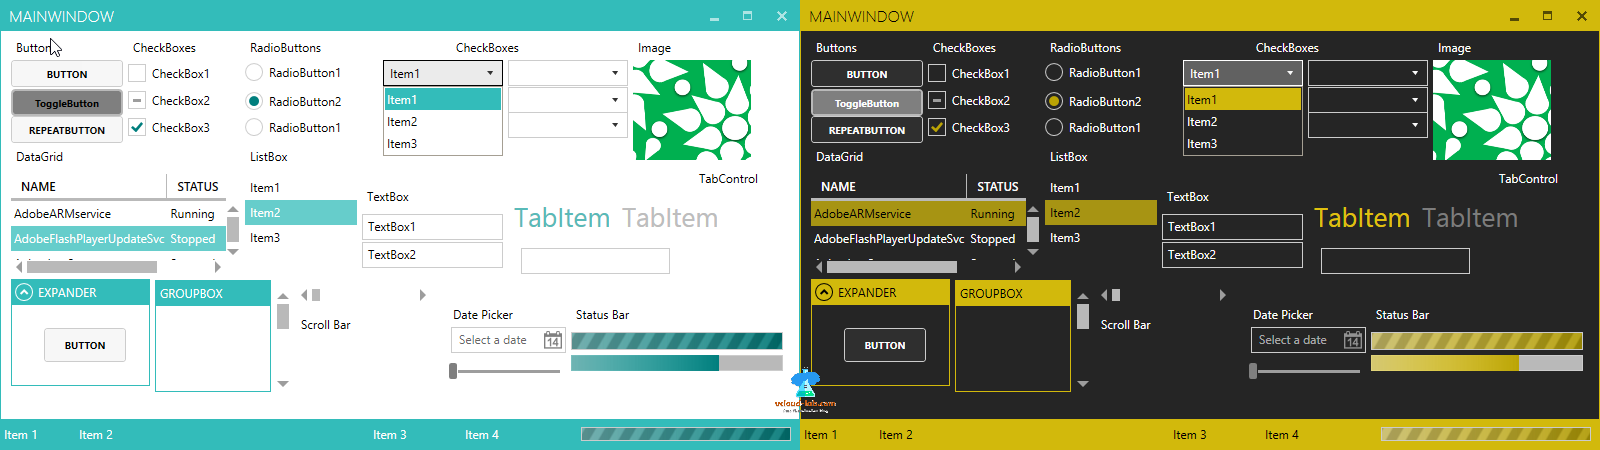
<ResourceDictionary Source="pack://application:,,,/MahApps.Metro;component/Styles/Accents/Yellow.xaml" />
<!-- “BaseLight”, “BaseDark” -->
<ResourceDictionary Source="pack://application:,,,/MahApps.Metro;component/Styles/Accents/BaseDark.xaml" />1
</ResourceDictionary.MergedDictionaries>
</ResourceDictionary>
</Window.Resources>
#5
This is last change to the xaml file, change the closing syntax of last line, with below line, and my complete script looks like below screenshot.
</Window> to </Controls:MetroWindow>.

Part 3: Create shorter Microsoft Powershell WPF automated clean script
Once these changes are done, I must admit, it looks very beautiful and professional than my earlier themes. I don't have to make a single change to adjust the colors or style unlike previous. There are few more custom controls given, also few nice icons and other stuff available which can be found on official https://mahapps.com/ website., It has detailed documentation.
Download this script from here, It is also available on github.com.
1 2 3 4 5 6 7 8 9 10 11 12 13 14 15 16 17 18 19 20 21 22 23 24 25 26 27 28 29 30 31 32 33 34 35 36 37 38 39 40 41 42 43 44 45 46 47 48 49 50 51 52 53 54 55 56 57 58 59 60 61 62 63 64 65 66 67 68 69 70 71 72 73 74 75 76 77 78 79 80 81 82 83 84 85 86 87 88 89 90 91 92 93 94 95 96 97 98 99 100 101 102 103 104 105 106 107 108 109 110 111 112 113 114 115 116 117 118 119 120 121 122 123 124 125 126 127 128 |
#Load required libraries #vcloud-lab.com Add-Type -AssemblyName PresentationFramework, PresentationCore, WindowsBase, System.Windows.Forms, System.Drawing $ScriptPath = Split-Path -Parent $MyInvocation.MyCommand.Path $AssemblyLocation = Join-Path -Path $ScriptPath -ChildPath .\themes foreach ($Assembly in (Dir $AssemblyLocation -Filter *.dll)) { [System.Reflection.Assembly]::LoadFrom($Assembly.fullName) | out-null } [xml]$xaml = @" <Controls:MetroWindow xmlns="http://schemas.microsoft.com/winfx/2006/xaml/presentation" xmlns:x="http://schemas.microsoft.com/winfx/2006/xaml" xmlns:d="http://schemas.microsoft.com/expression/blend/2008" xmlns:mc="http://schemas.openxmlformats.org/markup-compatibility/2006" xmlns:Controls="clr-namespace:MahApps.Metro.Controls;assembly=MahApps.Metro" Title="MainWindow" Height="450" Width="800"> <Window.Resources> <ResourceDictionary> <ResourceDictionary.MergedDictionaries> <!-- MahApps.Metro resource dictionaries. Make sure that all file names are Case Sensitive! --> <ResourceDictionary Source="pack://application:,,,/MahApps.Metro;component/Styles/Controls.xaml" /> <ResourceDictionary Source="pack://application:,,,/MahApps.Metro;component/Styles/Fonts.xaml" /> <ResourceDictionary Source="pack://application:,,,/MahApps.Metro;component/Styles/Colors.xaml" /> <!-- Accent and AppTheme setting --> <!--“Red”, “Green”, “Blue”, “Purple”, “Orange”, “Lime”, “Emerald”, “Teal”, “Cyan”, “Cobalt”, “Indigo”, “Violet”, “Pink”, “Magenta”, “Crimson”, “Amber”, “Yellow”, “Brown”, “Olive”, “Steel”, “Mauve”, “Taupe”, “Sienna” --> <ResourceDictionary Source="pack://application:,,,/MahApps.Metro;component/Styles/Accents/Yellow.xaml" /> <!-- “BaseLight”, “BaseDark” --> <ResourceDictionary Source="pack://application:,,,/MahApps.Metro;component/Styles/Accents/BaseDark.xaml" /> </ResourceDictionary.MergedDictionaries> </ResourceDictionary> </Window.Resources> <Grid> <Label Content="Buttons" HorizontalAlignment="Left" Margin="10,3,0,0" VerticalAlignment="Top" Width="112"/> <Button Content="Button" HorizontalAlignment="Left" Margin="10,29,0,0" VerticalAlignment="Top" Width="112"/> <ToggleButton Content="ToggleButton" HorizontalAlignment="Left" Margin="10,58,0,0" VerticalAlignment="Top" Width="112" IsChecked="True"/> <RepeatButton Content="RepeatButton" HorizontalAlignment="Left" Margin="10,85,0,0" VerticalAlignment="Top" Width="112"/> <Label Content="CheckBoxes" HorizontalAlignment="Left" Margin="127,3,0,0" VerticalAlignment="Top" Width="112"/> <CheckBox Content="CheckBox1" HorizontalAlignment="Left" Margin="127,32,0,0" VerticalAlignment="Top" Height="20"/> <CheckBox Content="CheckBox2" HorizontalAlignment="Left" Margin="127,60,0,0" VerticalAlignment="Top" IsChecked="{x:Null}"/> <CheckBox Content="CheckBox3" HorizontalAlignment="Left" Margin="127,87,0,0" VerticalAlignment="Top" IsChecked="True"/> <Label Content="RadioButtons" HorizontalAlignment="Left" Margin="244,3,0,0" VerticalAlignment="Top" Width="112"/> <RadioButton Content="RadioButton1" HorizontalAlignment="Left" Margin="244,32,0,0" VerticalAlignment="Top"/> <RadioButton Content="RadioButton2" HorizontalAlignment="Left" Margin="244,61,0,0" VerticalAlignment="Top" IsChecked="True"/> <RadioButton Content="RadioButton1" HorizontalAlignment="Left" Margin="244,87,0,0" VerticalAlignment="Top"/> <Label Content="CheckBoxes" HorizontalAlignment="Left" Margin="450,3,0,0" VerticalAlignment="Top" Width="112"/> <ComboBox Name="combobox1" HorizontalAlignment="Left" Margin="382,29,0,0" VerticalAlignment="Top" Width="120" IsDropDownOpen="True"/> <ComboBox HorizontalAlignment="Left" Margin="507,29,0,0" VerticalAlignment="Top" Width="120" IsHitTestVisible="True"/> <ComboBox HorizontalAlignment="Left" Margin="507,56,0,0" VerticalAlignment="Top" Width="120" /> <ComboBox HorizontalAlignment="Left" Margin="507,81,0,0" VerticalAlignment="Top" Width="120" /> <Label Content="Image" HorizontalAlignment="Left" Margin="632,3,0,0" VerticalAlignment="Top" Width="134"/> <Image Name="Image1" HorizontalAlignment="Left" Height="100" Margin="632,29,0,0" VerticalAlignment="Top" Width="134"/> <Label Content="DataGrid" HorizontalAlignment="Left" Margin="10,112,0,0" VerticalAlignment="Top" Width="224"/> <DataGrid Name="Datagrid" HorizontalAlignment="Left" Height="100" Margin="10,143,0,0" VerticalAlignment="Top" Width="229"/> <Label Content="ListBox" HorizontalAlignment="Left" Margin="244,112,0,0" VerticalAlignment="Top" Width="112"/> <ListBox Name='ListBox' HorizontalAlignment="Left" Height="100" Margin="244,144,0,0" VerticalAlignment="Top" Width="112"/> <Label Content="TabControl" HorizontalAlignment="Left" Margin="693,134,0,0" VerticalAlignment="Top" Width="89"/> <TabControl HorizontalAlignment="Left" Height="100" Margin="507,165,0,0" VerticalAlignment="Top" Width="275"> <TabItem Header="TabItem"> <Grid> <PasswordBox HorizontalAlignment="Left" Margin="10,10,0,0" VerticalAlignment="Top" Width="149" Grid.ColumnSpan="2"/> </Grid> </TabItem> <TabItem Header="TabItem"> <Grid></Grid> </TabItem> </TabControl> <TextBox HorizontalAlignment="Left" Height="23" Margin="361,183,0,0" TextWrapping="Wrap" Text="TextBox1" VerticalAlignment="Top" Width="141"/> <TextBox HorizontalAlignment="Left" Height="23" Margin="361,211,0,0" TextWrapping="Wrap" Text="TextBox2" VerticalAlignment="Top" Width="141"/> <Label Content="TextBox" HorizontalAlignment="Left" Margin="361,152,0,0" VerticalAlignment="Top" Width="141"/> <ProgressBar HorizontalAlignment="Left" Height="16" Margin="570,324,0,0" VerticalAlignment="Top" Width="212" Value="70"/> <StatusBar Name="statusBar1" Height="30" HorizontalAlignment="Stretch" VerticalAlignment="Bottom"> <StatusBarItem Content="Item 1" Width="75"/> <StatusBarItem Content="Item 2" Width="112" /> <StatusBarItem HorizontalAlignment="Right"> <StackPanel Orientation="Horizontal"> <StatusBarItem Content="Item 3" Width="92"/> <StatusBarItem Content="Item 4" Width="114"/> <ProgressBar Height="14" Width="210" IsIndeterminate="True" Margin="5,0"/> </StackPanel> </StatusBarItem> </StatusBar> <Label Content="Status Bar" HorizontalAlignment="Left" Margin="570,270,0,0" VerticalAlignment="Top" Width="212"/> <ProgressBar HorizontalAlignment="Left" Height="18" Margin="570,301,0,0" VerticalAlignment="Top" Width="212" IsIndeterminate="true"/> <DatePicker HorizontalAlignment="Left" Margin="450,296,0,0" VerticalAlignment="Top" Width="115"/> <Label Content="Date Picker" HorizontalAlignment="Left" Margin="447,270,0,0" VerticalAlignment="Top" Width="115"/> <Expander Header="Expander" HorizontalAlignment="Left" Height="107" Margin="10,248,0,0" VerticalAlignment="Top" Width="139" IsExpanded="True"> <Button Content="Button" HorizontalAlignment="Left" Margin="28,0,0,0" Width="82" Height="34"/> </Expander> <Slider HorizontalAlignment="Left" Margin="447,332,0,0" VerticalAlignment="Top" Width="112"/> <GroupBox Header="GroupBox" HorizontalAlignment="Left" Height="112" Margin="154,249,0,0" VerticalAlignment="Top" Width="116"/> <ScrollBar HorizontalAlignment="Left" Margin="275,257,0,0" VerticalAlignment="Top" Height="104" Width="14"/> <ScrollBar HorizontalAlignment="Left" Margin="295,257,0,0" VerticalAlignment="Top" Width="135" Orientation="Horizontal" /> <Label Content="Scroll Bar" HorizontalAlignment="Left" Margin="295,280,0,0" VerticalAlignment="Top" Width="112"/> </Grid> </Controls:MetroWindow> "@ #Read the form $Reader = (New-Object System.Xml.XmlNodeReader $xaml) $Form = [Windows.Markup.XamlReader]::Load($reader) #AutoFind all controls $xaml.SelectNodes("//*[@*[contains(translate(name(.),'n','N'),'Name')]]") | ForEach-Object { New-Variable -Name $_.Name -Value $Form.FindName($_.Name) -Force } $ComboBox1.ItemsSource = @('Item1','Item2','Item3') $combobox1.SelectedItem = 'Item1' $Image1.Source = 'C:\Temp\MetroDarkTheme\Image.png' #$DataGrid.RowBackground = 'Black' $Datagrid.ItemsSource = Get-Service | Select-Object Name, Status, StartType -First 5 $ListBox.ItemsSource = @('Item1','Item2','Item3') $combobox1.SelectedItem = 'Item1' #Mandetory last line of every script to load form [void]$Form.ShowDialog() |
Useful Articles
COOL POWERSHELL FREE ONLINE GUI GENERATOR TOOL, POSHGUI
Generate random password GUI using powershell
Part 1: Create WPF XAML powershell GUI form with Visual studio
Part 2: Powershell and WPF: Build GUI applications tutorial
Part 3: Create shorter Microsoft Powershell WPF automated clean script
Powershell WPF Themes guide step by step
Part 2: Powershell WPF Themes guide step by step
Powershell WPF custom Image based ProgressBar
