In the earlier article Microsoft Windows 2016 Install and configure NFS server for ESXi and Linux, I shown on installing and configuring NFS server on Microsoft Windows 2016 sever. NFS datastores is one of the file type of datastore to keep virtual machines on VMWare Esxi server, This is also good options to keep ISO and VM templates, NFS datastores can be very economical for the this purpose, it is also capable of running Production environment. NFS protocol uses existing IP TCP/IP based network protocol and it is relatively easy to design and deployment. With high performance supported storage on VMware HCL and 10 Gig network cards you can run high IOPs required applications and VMs without any issues.
Warning: Windows NFS server is not listed on VMWare HCL as Esxi NFS datastore. I am using it as a demo purpose.
There are two types datastores filesystem supported on VMWare Esxi, VMFS and NFS. NFS file system protocol is very handy and supports some of the below notable features.
- VMware DRS and VMware HA
- Virtual machine snapshots
- vMotion
- ISO images, which are presented as CD-ROMs to virtual machines
I have small diagram here, it shows how I have separate network path on Esxi to connect to NAS / NFS storage.
Related Article
MICROSFOT WINDOWS 2012 R2 ISCSI TARGET STORAGE SERVER FOR ESXI AND HYPERV
Microsoft Powershell: Windows 2016 Install and configure NFS server
I use NFS datastore to mainly store ISO images and templates (On tier 3 drives), also use it when migrating Virtual Machines between at Esxi located at different location, Once svmotion vm to NFS datastores, data or VMs are easily portable by mounting NFS datastores to another ESXi. If NFS is on portable small NAS device it makes very easy to task get done by shipping devices and NFS doesn't require any extra configuration. Configuring NFS datastore on Esxi requires VMKernel portgroup to be exist, The VMkernel TCP/IP stack handles iSCSI, NFS, and vMotion. I have already written one article to configure VMkernel portgroup for Iscsi, but can be used here as well --> VMWARE ESXI CONFIGURE (VSWITCH) VMKERNEL NETWORK PORT FOR ISCSI STORAGE.
In the VMWare vSphere Web Client, Select ESXi server, go to Configure tab, Select Datastores from list, Click on Create a new datastore. This opens new datastore wizard.
In the New Datastore wizard, select and specify datastore type NFS (Create an NFS datastore on an NFS share over the network).
Select NFS 3 version, make sure you use only one NFS version to access a given datastore. Consequences of mounting one or more hosts to the same datastore using different versions can include data corruption.
In the Name and configuration, Specify datastore name, folder and server name to mount NFS datastore. Access mode should be Read/Write if it is intended to run Virtual machines. Also another thing is If you plan to configure an existing datastore on new hosts in the datacenter, it is recommended to use the "mount to additional hosts" action instead.
To view this information you can check earlier blog screenshot to view current NFS configuration.
This is last step of configuration of New Datastore. In the Ready to complete page, review your settings selections before finishing the wizard.
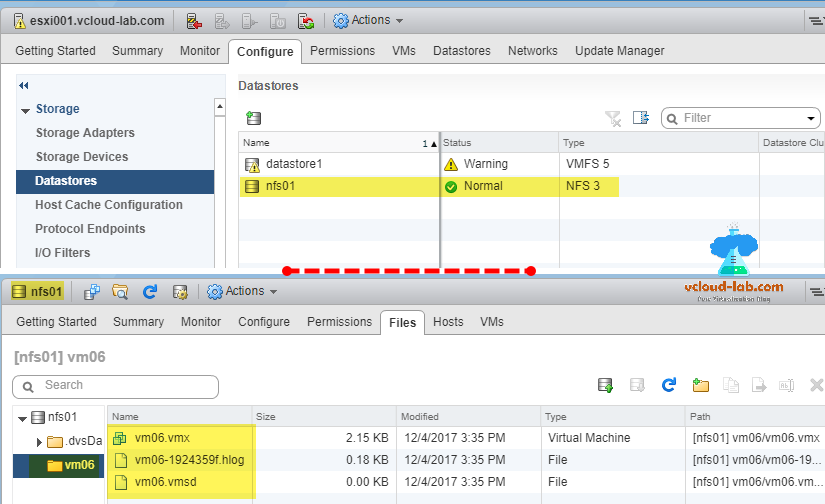
Once Datastore is created successfully, it can be listed under Datastores. I have migrated one virtual machine to this NFS datastore to check everything is working, Once browsed it VM is located and I have correct access. Next contrary to VMFS datastore mount, you will have to mount NFS share on each esxi server individually and there is a separate procedure which can be found on Mount NFS share to multiple ESXi hosts.
Useful Article
VMWARE ESXI CONFIGURE (VSWITCH) VMKERNEL NETWORK PORT FOR ISCSI STORAGE
VMWARE ESXI INSTALL AND CONFIGURE SOFTWARE ISCSI STORAGE ADAPTER FOR VMFS VERSION 6 DATASTORE
VMWARE VCENTER STORAGE MIGRATE/SVMOTION VM AND PORT BINDING MULTIPATHING TESTING
MICROSFOT WINDOWS 2012 R2 ISCSI TARGET STORAGE SERVER FOR ESXI AND HYPERV
Unmount NFS datastores from VMware ESXi and NFS is in use
Add NFS datastores to VMware ESXi hosts using PowerCLI


